Showing posts with label trim. Show all posts

Thursday, February 24, 2011

Dying Camera

This is the detail overhead when you come down the stairs to the first floor

A slightly better photo of the new shelves in the kitchen

I managed to coax the lens out on our dying camera today to take some semi-okay quality photos. At least they are better then the grainy photos the iPod takes when the light is low.

I finished a little playful detail over the stair of steam-bent maple that forms sort of a swoop from the second floor down to the first. Quality-wise it is a little rough, but I like the effect. I may re-do it sometime.

Besides that I got a bunch of the last pieces of trim poly-ed and I'll be throwing some quills in those tomorrow and that'll be that for trim.

Monday, January 24, 2011

...and we continue on...

The very first fire in the woodstove

Nancy doing some more of the painting following Adam having completed the trim inside the bathroom

The appliances sitting in place in the kitchen. The stove and the fridge are soon to follow, although nothing is actually hooked up yet, I just need them there so I can install the trim to match up correctly

This section cabinetry is very close to complete. A few more vertical trim pieces, fit the drawer fronts and that'll be it. Oh yes, we'll need knobs and pulls.

We've been making steady progress. Adam has been working through all sorts of trim-out projects that includes all the doors downstairs, a couple of doorways upstairs, a single step down into the guest room and coming up in the next couple of days the finish work on the the main stairway from first to second. Nancy patiently did a super nice job finishing and sanding the stair treads five times over. They look great. Also, I think its fair to say that the painting is all done. There'll be some touch-ups here and there, but all the significant stuff, and most of the insignificant stuff is now done.

I've been continuing on the cabinets and am almost ready to start on the counter tops. In fact, my plan is to go get the material tomorrow and begin fabrication later this week. I'm feeling quite happy with how the whole cabinetry project is developing; as I've said before, this is new and fussy territory for me, so it is satisfying to see it work out well.

Oh yes, we've started lighting fires in the woodstove and it is just great. It's quiet, beautiful and puts out nice heat. We had to carefully light a series of small fires that "season" the stone and burn off the fumes from the new stovepipe and stove enamel. It's wicked cozy. Last night the temperature got down to around -16 below zero, so it feels good to have the stove going. Even with the cold it just feels good to be in the house. The experience of this whole super-insulation thing so far is just an even, comfortable, and stable environment.

Tuesday, January 11, 2011

Progress...


The last few days have seen a few developments: the floor finishing crew has been here and given all the floor surfaces a thorough sanding and have now put down the first of three layers of polyurethane. The floors look great but the fumes are nearly unbearable, so consequently Nance and I are fully living back in the yurt for the week until the floor process is complete.

I installed the shower fixtures last Sunday before work on the floors began. They look great but we haven't had a chance to actually test the shower out yet since we were waiting for some caulk to dry. We'll get our chance this weekend once we can get back in the house.

I've been back at the cabinetry project and have put together most of the cabinet doors. Tomorrow I'll start building the drawers and drawer fronts.

Today I also made a run over the mountain for maple that we'll be using for the baseboard and door trim on the first floor.

Monday, November 1, 2010

While I'm away...


..teaching at Yestermorrow this week, work is continuing.

Nancy has been continuing to paint and Joe is working on finishing up the window trim around the house, and is nearly there. Soon after will follow the installation of the interior doors. Fun.

I spent a little time over the weekend installing bead-board in the second floor bathroom. It goes really quick, but unfortunatly I ran out of time and I'm not sure if I'll be able to get back to it until the end of this class.

In any event things are moving along.

Thursday, October 21, 2010

Windows and Cabinets

The cabinetry plans as they currenlty stand. We've simplified and cleaned up the whole package a bit and it feels better

One of the windows Joe has built out. The apron (the bottom piece) is not in place because I asked Joe to hold off installing it because I wanted to modify the design slightly, which I've since done; it'll be a little more refined and in keeping with other thematic elements of the house

Joe has been plugging away at building the window returns and installing the trim. Its a particular job and requires a lot of attention and careful work and Joe has been doing a great job. We're over halfway done at this point.

I've been concentrating on the cabinetry project for the kitchen. We've pretty much worked out our plan and now my job is to draw up construction plans, make cut lists and order materials. Its going to be an involved project, but I'm pretty psyched about it.

Saturday, October 16, 2010

HRV and windows


Our HRV unit is installed and running.

HRV is short for "heat recovery ventilation" and the main purpose of the system is to cycle fresh air into the house (and stale air out) on a regular schedule. The reason this is necessary is that the house was constructed so tightly that we can't rely on fresh air to simply work it's way inside as has been customary in most construction for as long as homes have been built.

Unlike a simple fan system, the HRV helps maintain the warm air in the house by a heat exchange process where the cool air coming in is passed by the warm air exiting and in the process acting upon each other to moderate the cool air so that we are not simply bringing in cold air that would cool the house and require additional heating to maintain the inside temperature. Secondarily, the HRV unit serves to move moisture out of the house that would otherwise build up from cooking, showering, and respirating. If you go into the bathroom what you'll find is not a fan switch, but a button that activates the HRV unit on "high" for twenty minutes. This does the same thing a fan does, but there is no audible sound (since the unit is located in the basement) and we are not just blowing heated air outside through a big hole in the wall.

Meanwhile, Joe and I have been moving ahead on the widow returns and trim. We've got the process pretty well streamlined and are making good progress. We've got six windows done out of 14, so eight still to go. They look great.

Sunday, October 3, 2010

Weekend Project

Nance painting the second floor bathroom blue

The clawfoot tub. Working on removing the rust on the interior and will soon scrape and repaint the exterior

Various tub and sink parts I need to sort through

Nancy and I each spent time this weekend working in the second floor bathroom; she on painting and I on fabricating the window returns and sill. We are trying to complete the bathroom as a stand alone project in our spare time, outside of our broader work plan, so we'll be able to use it sooner rather then later and it'll be out of the way of other work.

We plan to have bead-board wainscotting up the wall to just below the eaves so Nancy is only painting down to where the beadboard will come up and meet the painted sheetrock.

I also spent some time on the clawfoot bathtub, since we'll be needing this soon enough in the bathroom. I acquired this tub about 9 or 10 years ago from an old colleague in Boston. At the time I was just excited because it held the potential for some far off "someday" dream of having a house in which to use this tub. Now is that time. There are some rust-stained areas that I've been avoiding dealing with because I've been afraid that whatever it is that can take off the rust is also going to remove the enameled surface of the tub, but today I bit the bullet and went for it. I was able to remove a bunch of the rust but after a while decided to let it rest for a bit and go back for another round sometime soon. An inspection later on seemed to indicate that the enamel seems to be okay. Phew.

Another project coming up is working out the various tub faucets and drains. I have a bucket of parts that came with the tub, but I'm not sure that what we need is there. I need to sort through this and figure out what we are going to do.

Thursday, September 30, 2010

One window done

Window in the mudroom complete

Landscaping continues

I struggled mightily to work out the kinks to get this window trim project done. Now that I've done it the completed version is a road map for all the rest, so they'll be easy by comparison. In the end I'm very happy with the finished product.

Mac has been continuing work grading the exterior, shaping the contours and putting down top soil. When he's done I come after and throw down grass seed and hay. We built a minor little rock wall at the base of the slope off the west end of the house. It'll make a great shaded sitting spot on hot days in the summer. A tropical rain event has halted all further landscape work until further notice...

Friday, September 10, 2010

Sunny end to a cloudy week


You can't really see it here, but under the overhang there are two horizontal pieces of trim that bring the top of the clapboard siding down a little. The lower piece is bracketed on each end by the curved pieces at either end. I like what it does to the overall look. (Click photo to embiggen the view)

We got almost all the way there with the west wall, but the truth is there are a bunch of trim details as you work up around the dormer that make it a little cumbersome at the end. I did my best to work a few steps ahead of Adam and Joe, but in the end was barely doing so.

I'm really pleased with how all the details are coming together, especially since I really didn't have a plan going into the whole siding project. It was working out that corner post cap with a curve that really set the pattern and freed me up to make the rest happen.

Joe is off to a historical reenactor's weekend and Adam, Nancy and I are headed to the contra dance in Burlington. Tomorrow, Adam and I are going to do a little Saturday work...

Tuesday, September 7, 2010

Project Doorway

The door frame as it stand now...

I've spent the last two days working out how to frame the door on the west wall. I habitually rubber-neck old houses for details and have spent a bunch of time thinking about the possibilities, but when the time came hadn't actually worked out a definite design. In retrospect it would have been profitable to spend some time drawing before launching into actually building the details. With most of the details on the house I've felt fairly confident and almost casual about what direction to go--I've trusted my take and generally just moved ahead and it's worked well. This door project proved to be a different story.

Right off the bat I could tell I didn't really have a sense of direction. I forged ahead anyways and just started putting pieces up, taking them down, cutting them to different lengths or widths in an attempt to sort of collage together a direction.


Some scholars claim that hot-glue was used periodically by the Greeks when constructing temples

I realized in doing this I was squandering fairly good material that I might not actually use in the final product, so instead of cutting up perfectly good wood I started hot-gluing scraps together to lengthen a piece I cut too short, or gluing on a little piece to see how it looked. I spent may hours yesterday doing this and at some point lit upon the idea that the architrave-frieze section could have a dentil molding that referenced the roof lookouts. (See the drawing below to clarify what these names refer to). This got my sense of direction going a bit and by the end of the day on Sunday I felt like I was at least moving towards a solution, but knew also that it wasn't quite right. This was more or less where I ended up yesterday:


Results of day one

Today I went back at it and again spent considerable amounts of time working on this little project. At some point I stepped into the yurt and typed "Greek revival doorway" into Google and checked out what came up. The following drawing caught my eye and helped me move forward a bit. I've added the names of the various parts to help clarify what's what.


When I saw this drawing it helped me realize that rather then adding the little horizontal detail at the top of the "columns" (the vertical pieces on either side of the door) I needed to add a cornice-like section to lift the whole thing up a bit from the top of the door.
That got me here:


At this point I felt like like I was on the right track and so started to actually build and install the
finished product. By the end of the day I had the project all up and complete and decided to let it sit for a little while (see picture at top). The top pieces are screwed in, so I can take them out and mess with it all a bit more if need be.

Though I love this sort of work, this whole thing just didn't come easy.


Tuesday, August 31, 2010

Paint colors

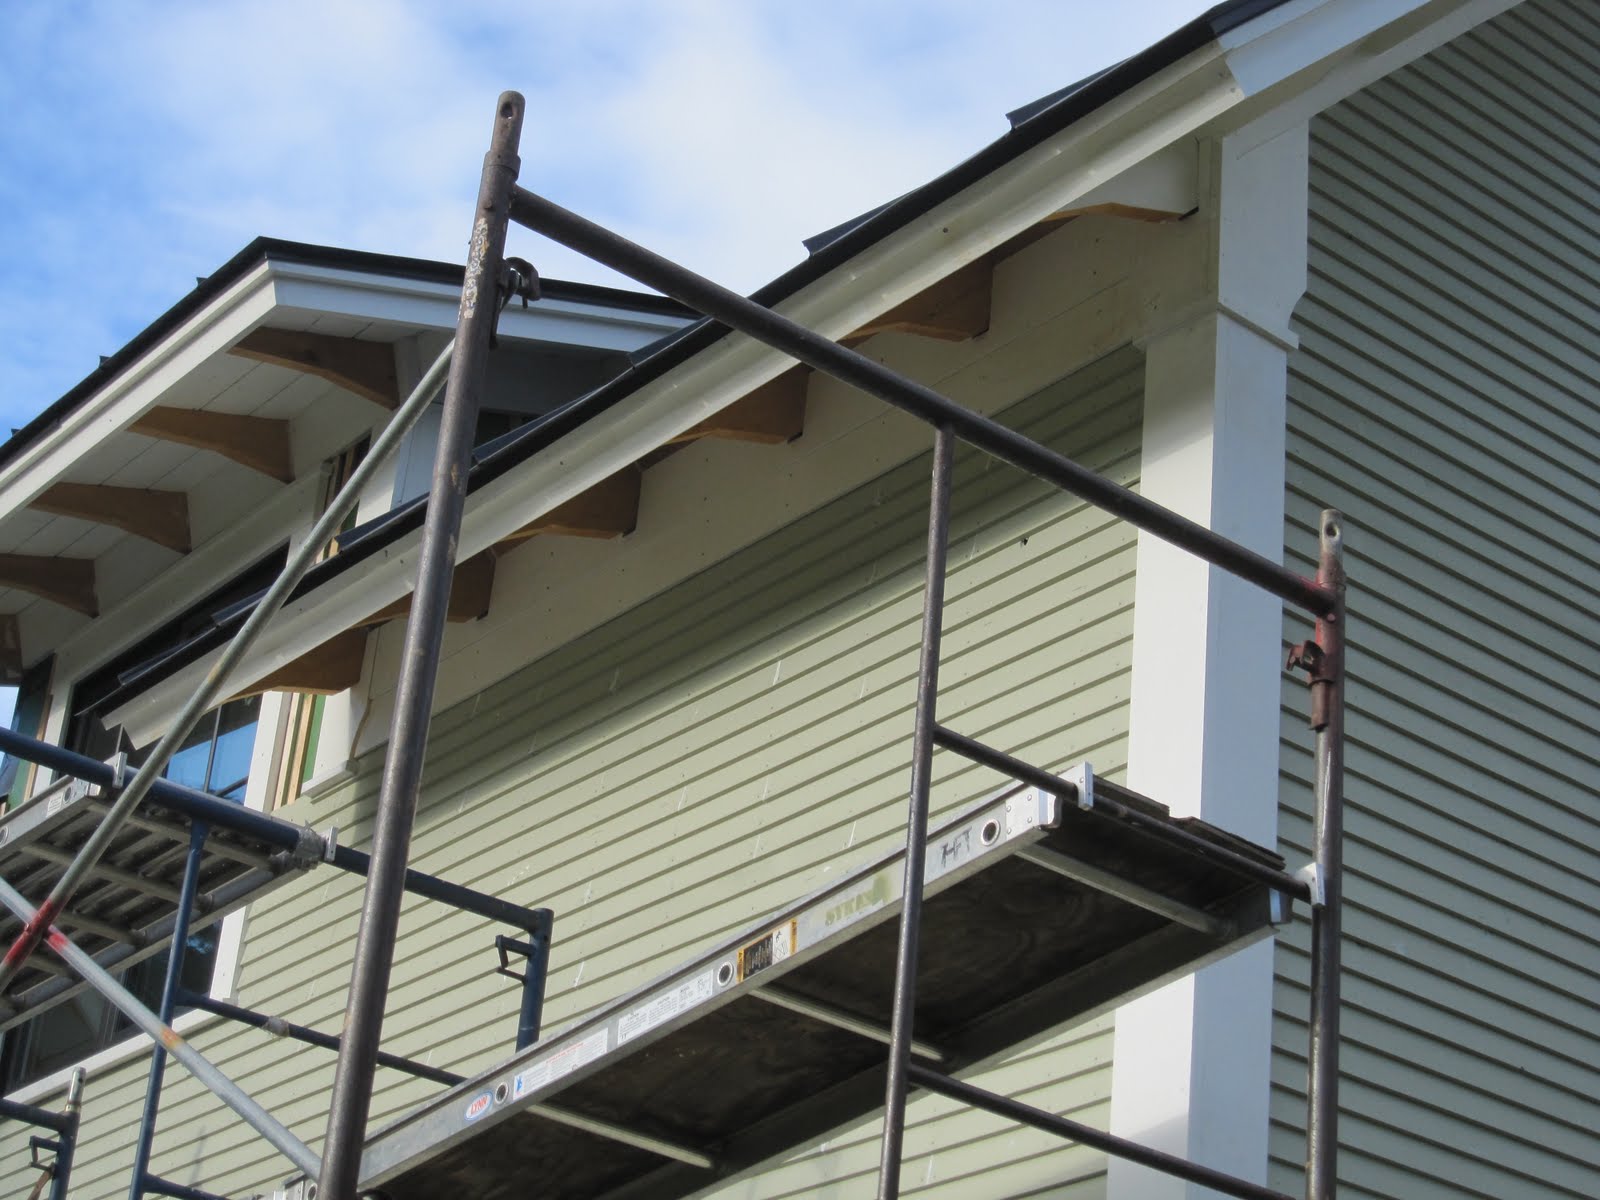
Our color scheme in action

Clapboards are going up on the south side of the house
The house whose color scheme we copied

Nancy and I did a lot of work trying to work out the paint colors for the house last fall before we put in the order for our windows, wanting them to all work as a unit. In the end we ended up finding a house in the next town whose colors we admired and ended up meeting the owners who lent us some of their paint. We just used what they had already worked out.

Colors are hard to figure out, at least for me. I know what I like when I see it, but I have a hard time seeing a color in my mind's eye before and knowing that its what I want.

We completed the clapboarding up the back of the north wall but before we took down all the scaffolding we wanted to get the triangular area of the gable end completely painted so we won't have to go back up there until the next time we need to paint, which will hopefully be a good number of years.

For the record we are technically staining the house rather then painting. I'm not quite sure of the difference, but when it comes to having to repaint using stain means we won't have to scrape first; we'll just be able to go over what's there. The downside of stain is that it needs to be recoated sooner then paint would. I hate scraping but enjoy painting, so the trade-offs seem fine to me.

If you are curious our exterior colors are:

Trim: Benjamin Moore "Mascarpone" semi-gloss
Clapboards: Benjamin Moore "Tree Moss" flat
Window frames and roof: Black

Sunday, August 15, 2010

Trim work


Adam and I finished off the week continuing to put up the window frames. These, along with the corner boards and water table already in place are starting to really bring the look of the exterior into focus. I find the house catching my eye and it feels good. If anything I think I'm a little surprised because its starting to look like a nice place, which is great but not what my sense of purpose has been around this thing, but I guess that's what happens when you decide you don't want to just do run-of-the-mill easy details. In other words, the desire to put thought, quality and effort into the overall appearance of the house is starting to add up to something that has some character and distinction.

Joe will be back this week and he and I will be getting everything ready for the sheetrockers to come in towards the end of the week. We could do the sheetrock work, and for a long while we were planning on doing it, but in the end we decided that the expense would easily justify the quality job that we'd get by hiring it out, while allowing Joe and I to make headway on the exterior. Once he and I have everything good for the sheetrock work, we'll be back at the outside work.

In addition to the sheetrock crew we're gonna have a couple of special guest helpers showing up later in the week. Stay tuned...

Thursday, August 12, 2010

Initial siding work

The corner boards and water table in place

Adam at work

This photo shows the screen/mesh combination that keeps bugs from traveling up behind the water table board where they could nest and cause trouble


Today Adam and I completed installing the water table around the base of the house, having installed the corner boards yesterday. The water table is the horizontal piece of wood that sits at the bottom edge of the house exterior. I'm not sure why its called a water table, but it is. This piece of trim is fixed tightly against the screen and mesh that are installed between the wooden battens around the house. The mesh/screen combo are in place to keep bugs from making nests up behind the siding.

Tomorrow we'll install a wooden drip cap over the water table. This is basically a decorative piece that sheds water from the siding down over the water table. After that we start putting up the window trim and once that's done we're off and running with the clapboard.

Its great to be finally working on the exterior.

Tuesday, August 10, 2010

Moving Outside

Adam installing battens

Bug screen at the bottom of the wall. This will get covered by a 9 1/2" wide horizontal board called the water table, which creates the starting point for the clapboard

Getting the first piece of trim up

After a brief period of rejuvenation on Cape Cod we are back to work this week and have moved our attention to the outside of the house.

Our friend Adam is helping out while Joe is away a dance camp for the week. Its great to have friends like Adam to call on.

We spent yesterday prepping the perimeter of the house before we could start putting up any trim. Adam worked on adding needed wood battens around the windows and corners where trim will land, while I worked on installing bug screen at the base of the house walls. This will keep bugs out of the air space created by the battens between the clapboard siding and the zip system green wall sheathing.

Nancy spent the better part of the day painting trim and clapboard.

At the end of the day we had just enough time to get our first piece of corner board in place. Tomorrow we'll try to get the rest up and maybe even get started on the water table. What's a water table? We'll it's the horizontal piece of wood that is at the base of the house before the clapboard starts. You don't see it on all houses, but it seemed like a nice detail to include, so we are going with it.

Wednesday, May 26, 2010

Today's Window


This morning I tried out a different style of window trim. I like this a lot better then yesterday's approach. Nance liked it better too.

Tomorrow I'll go with the same style, but thin up the boards a bit. What is there now is 5 1/2" inches wide. I'll try 4 1/2" and see how that feels.

Joe came back and was hard at work today. Him being here helps me to stay focused and its great to have two of us making headway. Welcome back Joe!

Tuesday, May 25, 2010

Window Trim


Today I spent a little time driving around the village checking out the exterior window casing of various old houses. I found the ones that had a bit of notable cornice detail caught my attention.

Here's one I liked:


I came home and did up a version for one of the windows in the back of the house. Once it was up, Nance and I looked at it and decided that there was maybe a little too much drama at the top. We also thought it would make sense to try it on a larger window that is more representative of the average. So I spent the latter part of the day working on another toned-down version. I'll get that up tomorrow.

Joe doesn't know it yet, but once I work out the details on this, he's going to be the guy making up the trim for the windows while I get ready to insulate. Joe's due back tomorrow.

Tuesday, September 29, 2009

Rafters


Yesterday Joe and I shaped the gable end rafters and then installed them in the gable end wall in preparation for lifting the wall, probably today. There are some fussy details that have to do with the way the roof sheathing will meet, so it took some time and careful planning to make sure we were on the right track.

Before we finish off the wall we'll be installing trim and some of the clapboard siding up at the peak of the wall since this stuff is so much easier to do while the wall is laying down then it is at the top of a ladder some 25-30 feet up in the air.