Showing posts with label snow. Show all posts

Monday, March 7, 2011

Venting issues

See that white thing just above the back object? That is the boiler vent. The object just above that is the water spigot, and if you look up toward the corner along the same wall you can see the woodstove air intake. Still buried is the intake/exhaust for the HRV unit. I was able to stand on the snow and easily touch the roof


Our car. We got a near record amount of snow for a March storm


This morning we were awoke by the not-quite-full-on smoke alarm signaling intermittently. Not smelling smoke we quickly opened the doors and a bunch of windows in case it was a CO alarm, which it actually seems to have been.

We quickly ascertained that the boiler vent had been covered over by the prodigious snowstorm we experienced last night and today. The boiler is able to detect when the vent is blocked and will shut itself down which would prevent an accumulation of CO.

I suited up and went out to shovel the vent out. The amount of snow covering this thing was stunning. What was curious was the fact there seemed to be a bit of a bubble, for lack of a better way to describe it, around the vent. In other words there was a non-snow space that I shoveled into when I got near the vent pipe. What this makes me think is that the heat of the boiler vent gas was kind of creating its own little pocket under the snow and perhaps this was the reason the boiler seems to have not actually shut down, hence the CO alarm.

With the vent cleared and the house thoroughly aired out we shut the doors and windows and felt okay about the situation. It was a bit later that it occurred to me to check the HRV air supply duct as well. Like the boiler vent, it was also burried, and like the boiler vent it seemed to have it's own little air-space pocket in the snow once I reached it. Like the boiler vent it is venting warm-t0-hot air, so it makes sense.

We take this stuff absolutely seriously; I was aware of these potential problems when the installation work was done, but I got a bit of resistance and didn't push further about locating the venting higher up. I wish I had. The task now is to correct it.

To that end I'd already put in a call last week to the plumber about the situation, so we are going to correct it. On the upside, we are grateful for the alarm system and glad it works.

Wednesday, January 12, 2011

Drawer Boxes

Big snowfall today

Cabinet drawers in process. The interconnecting joints are called box joints

Today was an effort to keep warm and work well. We're staying out of the house while the nasty fumes from the polyurethane on the floors dries. Tomorrow is the last coat.

Today I spent making the boxes for our cabinet drawers and it went quite well. The easy part is planing them down to thickness and then the slightly trickier part is cutting the box joints at the ends. This requires some careful set-up on the table saw with a dado blade and a lot of micro adjustments, but in the end I got it all to work neatly.

A box joint is what you'll often see on traditional or nicer cabinet drawers. I'm familiar with making box joints for our bee hive boxes. It it a very satisfying way to join wood.

Tomorrow I'll complete the drawers and think through mounting the doors and getting ready to install the drawers. Maybe I'll even get beyond the thinking part!

Wednesday, April 28, 2010

Water supply lines

Supply lines running up from the manifold
(horizontal copper piece mounted on wall)

The lines come up from below and then make a
90 degree turn to exit what will be the wall

The copper fittings to which the sink will be attached to in the future

Today was spent running water supply lines. These are the lines that bring water to a sink, toilet, shower, washing machine or tub. Blues lines for cold, red lines for hot. In the old days all of this work would have been done with copper tubing and fittings which is both expensive and time consuming, but also requires precise routing of lines, whereas the plastic PEX supply lines are flexible and installed as a continuous line from manifold to fixture. I'm wondering if I might finish off the rest of the lines tomorrow. We'll see.

The view this morning as we received a late April snowstorm

Tuesday, March 2, 2010

Snowy days to build walls


Last week saw a welcome snowstorm after a full two months of no snow whatsoever. It was fun to see the snow pile up on the roof and then slide down in a big wuuuummmphff around the house.

While the snow was coming down I completed the wall that houses the pocket doors. This wall defines the office space and, despite our worries that the space would be compromised with a stair hatch to the basement, it feels like its going to work out pretty well. The doors are a good way to separate the living room area from the office area. I finished off the office space by building a little triangular hanging wall that encloses the upper part of the stairs.

That brought me to finishing the bathroom/washing machine/closet configuration on the second floor. I've now reconfigured that little are three times and I think we're good at this point. Here's the history:
1.The first iteration was simply an end wall with a doorway in it. As described in the last post, we decided that moving the door around the corner would be a better use of the space. There is a picture of this configuration in the Feb. 18th posting.
2. The second arrangement had the door around the corner with a closet adjacent to the end wall to house the washing machine. This is what is seen in the fourth photo.
3. We decided we didn't like how far out the closet came so we decided that we could steal some space from within the bathroom to house the washing machine and use the our nice looking existing armoire as a built-in in place of a enclosed closet. Photo number five.

We're going to stick with this layout for the time being.

Sunday, December 13, 2009

Woodstove

The Jøtul 4 doing it's work...

...me doing mine...

...and the stovepipe its

Joe and I installed the woodstove and most of the stovepipe on Friday, Nance and I picked up the one last piece of pipe we needed on Saturday, and today I fired up the ancient Jøtul woodstove we inherited with the property. I'd never really paid much attention to this stove; its been sitting in the corner of the garage for many years.

Once we had it in place in the house I was better able to appreciate its stately good looks, and once I'd fired it up, I was certainly able to appreciate its ability to warm up a frigid house.

After a couple hours of burning out the dust and breaking in the new pipe, the stove and I settled in for some comfortable work in the house. I'm working to get the paint/urethane finish on the garden-side door, so we can put it in the frame and be able to properly close the house. All the other doors and windows are in and good to go, so this last door is the final element to go in.

It was peaceful to be able to work in a warm, comfortable space with some relaxing music on and the snow swirling outside. Already I feel a sense of what its like to inhabit the house and it feels really really good.

Wednesday, December 9, 2009

Windows and snow

A visitor...

The door opening is covered in plastic while the door is awaiting its paint job

North side of the house--done

Today we charged ahead getting windows in. We tackled the high ones off the second floor on the back of the house and it all went fine, despite heavy swirling snow all around us. Today we got our first significant snowstorm of the season and now have maybe 8 or 9 inches. It felt like window by window we were truly inching out mother nature's ability to get into our house--no more wind or snow drift.

Tomorrow we'll put in the last three windows and the door that leads out of the basement to the hatch. After that we'll install the big old woodstove from the old house that once stood here to take the chill off inside while we work.

Saturday, December 5, 2009

Before the snow...

The back (north) side of the house. The bulkhead is lower right

Our new door

Retaining walls with partial gravel fill--more to come


We spent a couple of days last week building the retaining walls on either side of the basement hatchway. Its been on the to-do list for a long time, but it hasn't been pressing, so it was only now that we got to it. With the retaining walls in place, we can level and fill the ground adjacent on either side, which provides level ground for staging to install the windows on the back side of the house.

We also installed the entry door off the porch. As soon as it was in, I took it out of the frame and down to the basement for painting and finishing. Its a beautiful douglas fir door and we're quite pleased with it. Nance suggested that we paint the exterior a shade of green we'd considered for the exterior of the house and so that's what we are going with. Its a cool color. Stay posted for the unveiling.

Tuesday, October 13, 2009

Roofing begins


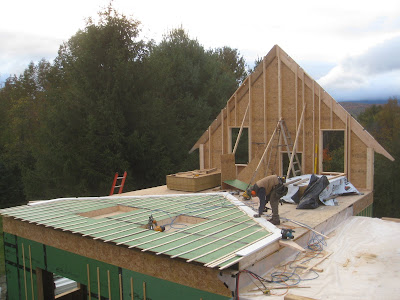
Joe and I got the rafters over the kitchen in place at the end of last week. Yesterday we put in the blocking and fly rafters to create the 2' overhang at the gable end of the roof. The fly rafters are the short rafters that extend out from the end of the gable wall, creating a sort of ladder up the edge of the roof. With these in place we were able to install the rake board trim and then start installing the rough sawn 1x6 lumber that will be seen from below when looking up at the roof overhang. With the snow this morning, working was a bit of a challenge since we were pretty much wet and cold all day. A little warmer or a little cooler would have helped, but rain in the 30's is not fun. Suffice to say we enjoyed the hot meal Nance heated up for us for lunch along with a cup of hot cider.

The work we've done the last couple of days sets us up to sheath the roof over the kitchen and then move onto the main roof. That'll mean we're back to cutting rafters and working out the intersection between the two roofs. I'm psyched to do work this stuff out. Lets hope for some dry weather and sunshine. Getting the roof over the kitchen is perfect timing as our window order is scheduled to show up late Thursday or early Friday and we need to be able to insure they are kept dry. The roof will be a big help.

Wednesday, September 30, 2009

The south end wall


Today we kicked in with the south end gable wall and made excellent progress. With only a whisper of rain the weather was chilly, but good. Word is there was snow at Stowe and thought maybe I saw some coming down up around Mount Ellen, thought its hard to say. Flurries are in the forecast for tonight and we just lit our first woodstove fire of the season.

To cut the notches on the end rafters Joe pulled out his 16" (415mm) Makita timber saw. Impressive machine, huh?

Tomorrow we put on the clapboard and stand 'er up.