Showing posts with label Adam. Show all posts

Sunday, June 26, 2011

House Warming


Look closely at Teri's card...


Yesterday a pile of folks showed up to visit, have a little food and look around. It was a great afternoon and the weather cleared up with a little time to do some mowing and arranging outside. It was a wonderful celebration.

Many friends and family were here. In particular it was great to have Joe and Adam back to celebrate what we all helped create. I wish we could finish building our house more often so we could have an excuse to gather together our friends and neighbors like this more frequently.

Our friends Jeanne and Craig thoughtfully offered a blessing of salt, wine, and bread inspired from a scene in "Its a Wonderful Life":
Bread- that this house may never know hunger
Salt - that life may always have flavor
Wine - that joy and prosperity may reign forever

Among the treats and great food, Nancy tried out a recent discovery called switchel, which used to be served a refreshing drink on farms in the days before gatorade-type drinks. Its super yummy and I'm hooked...

Saturday, February 12, 2011

We had a spider

Morning light on the stairs

A few more small parts and we'll be done for the short term in the kitchen

Another view of the stairs

Hooking up the sink and dishwasher plumbing

My efforts have continued in the kitchen the last few days, mostly hooking up the plumbing, making a back splash for the counter and enclosing/installing the dishwasher. Once the dishwasher was in and a last little bit of cabinet filler was installed on it's right side, we were able to move the refrigerator in from the yurt and finally have all our major appliances and fixtures in and operating. It is not much short of a miracle once again to be able to get water, heat it, make coffee and have refrigerated cream all right in one place and easy to access. I know it's normal and all that, but we've lived for a long time with water out of buckets and all that and now it's just so easy; it almost feels like some sort of embarrassing luxury.

One more coat of finish on the cabinet doors and drawer fronts and we'll call the kitchen "done", at least for a short while. I'll be building an island as soon as we are finished with our obligations to the bank, which should be soon.

Adam finished up a few days ago and now I'll be on my own finishing up the last few projects before we call it good.

Tuesday, February 8, 2011

Fun stuff

The sink looking all tidy with fixtures and an mineral oil finish on the counters. Note plumbing pieces in the cabinet underneath--water will not be flowing until tomorrow

Fitting the counter and creating necessary openings

This is the counter upside down--making the cut away that goes over and around the lip of the sink

Shaping the opening for the sink. The curved piece in back is a template that I used to router the curved edge

The last two stairs in place. Adam did a really nice job here

I've been working hard on the counter top project, which naturally leads into installing the sink, plumbing the supply lines, and hooking up the dishwasher. It all dovetails as the work progresses.
Shaping the counter tops was careful work and took some time, but it's looking excellent and fitting really nicely, so I am quite pleased. I spent most of today on the plumbing work and tomorrow I should have it all operating. Having our sink, stove, diswasher and fridge all hooked up and running will be monumental.

Adam came back yesterday evening and started up again today. He installed the last two stairs and they look great. Signs of finish everywhere!

Thursday, February 3, 2011

Checking for square

The first two pieces joined

There's a lot of clamping, drilling, gluing and screwing in this process


Checking for square. You can see the overlap pattern at the corner. You can also see the first counter section that I built sitting in place on the cabinet--it still needs to be trimmed and sanded before installing

This is my little sketch that sort of shows the plan. There's a gap where the sink will be

The work at the end of the day. I should have the rest built up tomorrow

Today I started building up the second section of maple counter top. This one is a little more complicated then the one featured in the last post, since it encompasses the corner of the cabinetry. Usually, counter tops that turn a corner and cut at a 45 degree angle and joined. In our case we are going to build the corner into the counter as a unit. Adam had the excellent suggestion to "every other" the pieces coming in from each angle and sort of make a weave pattern at the joint.

It's important that the whole thing maintain a nice 90 degree angle so it'll fit into the corner well when its done and I'm glad to say that seems to be working out pretty well.

Wednesday, February 2, 2011

Maple counter, Cherry landing

Scraping glue drips off the maple counter top

The glue-up process

Adam admiring his work having just put down a coat of poly on the stair landing floor

Today I built up the first section of maple butcher-block style counter top. The process requires drilling out the pieces one-by-one with two different size bits, putting in an anchor screw, taking the screw back out, gluing both boards and then putting them together with screws--about eight holes to a strip of maple. It took quite a long time to build up the section I made today, but that's how it goes. I'm very happy with the result. All that's required now is to trim it to fit and install it.
Tomorrow I'll be working on the section that goes around the sink and turns the corner on the cabinets. It'll be a little more complicated, but after today's work I'm feeling confident about it.

Meanwhile Adam installed the cherry floor on the landing located halfway up the stairs. They look great.

Tuesday, February 1, 2011

Day by day

Envisioning how I be fastening the maple pieces together for the countertop

The ripped stack of maple

The arced bottom step. The next one up will be similarly arced, although you can tell that from the photo

Adam cutting the radius on the bottom step

Adam is at work shaping the last couple of steps coming down the stairway. These are distinct because the leading edge is curved and they have curved risers underneath coming up to meet them. It took some effort but now they are off to the paint shop (a couple of sawhorses upstairs) for their finish work and then they'll go in soon to finish off the stair project.

I've been working on the counter top project and am making good headway. I took a bunch of 2" x 8" x 8' maple boards, planed them to smooth and then ripped them down into 1 3/4" x 1 3/4" pieces that again had to be planed. The next step is to cut them roughly to length and start gluing them into counters. I'll be doing that tomorrow.

A sign of near completion? Today the technician from the gas company came and hooked up our gas cooktop. We can now cook in our home. Whoo hoo!

Saturday, January 29, 2011

This weeks' work

One lamp refinished, one waiting for some work

Nancy getting ready to apply the oil finish to the cabinet doors and drawer fronts

The step that Adam built down to the guest room on the second floor

Adam putting in the plugs on the stair tread screw holes


We rounded off this week with more along the same lines as recent work. Adam got the majority of the stairs in and all the screw holes plugged (there are two stairs left to go that require some special shaping before installing, so that'll happen next week). Nancy began work on finishing the cabinets, which is a multi-stage process over many days (we are copying our friend Kate's recipe for cabinet finish which starts with an oil finish and the multiple coats of polyurethane). I did a small rewiring project to make a the switches in the guest room make a little more ergonomic sence, and Felton was here to wire up our stove/oven in the kitchen.

I spent this evening cleaning the oxidization and accumulated stuff off of one of a pair of lights that we plan to mount outside the west end garden doorway. I just happened to come across these lights a couple of months ago in a free pile outside someone's place on the chance we might want to use them. They strike me as a little formal, but they are nice lights so we are going to put them up and see what we think.

Thursday, January 27, 2011

Stairs, a step and a hood

Adam putting the final touches on the step leading down to the guest room on the second floor. Joe had the idea to make it a storage space as well as a step and I thought that was a great idea, so we made it happen

The hood over the stove. We'll be hooking up the stove in just a matter of days

The stair treads and risers in place. The last two steps are a different shape then the rest so they are not done yet

We've been cranking away at all sorts of projects. Adam has most of the baseboard cut and fitted for the second floor that is awaiting a couple of coats of polyurethane and then will be nailed into place. He's also built and installed the step leading down from the main area of the second floor to the guest room space. Joe had the great idea of making the step a storage space as well, so we went ahead and made it happen.

I've completed the cabinetry and now need to turn my attention to the counters. I have the wood and work on that project next week. In the meantime I'm working to get a few electrical projects in order so Felton can come and hook stuff up. One of those projects was installing the hood over the kitchen stove. Since we don't have overhead cabinets over our stove I chose to hang the hood with steel cable and it is a nice sort of minimal and neat solution.

Adam spent today installing the stairs and has done a fine job. They look and feel great. Tomorrow I'll be insulating them from below in order to dampen the sound between the first and second floors.

Nancy began finish work on the cabinetry this afternoon, starting with a coat of Watco oil finish. This we'll follow with a few coats of polyurethane. The nice thing about using the European-style hinges is that you can take your cabinet doors off in a second for things like applying finish. Likewise, we un-attached the drawer fronts so they are easy to work on. The cabinetry looks slick and it's going to be a nice package.

(Note on photos: Our camera is gone missing, most likely in some pocket or on some window sill, so we're relying on our iTouch built-in camera and the quality is sort of iffy. Hopefully the regular camera will show up soon)

Monday, January 24, 2011

...and we continue on...

The very first fire in the woodstove

Nancy doing some more of the painting following Adam having completed the trim inside the bathroom

The appliances sitting in place in the kitchen. The stove and the fridge are soon to follow, although nothing is actually hooked up yet, I just need them there so I can install the trim to match up correctly

This section cabinetry is very close to complete. A few more vertical trim pieces, fit the drawer fronts and that'll be it. Oh yes, we'll need knobs and pulls.

We've been making steady progress. Adam has been working through all sorts of trim-out projects that includes all the doors downstairs, a couple of doorways upstairs, a single step down into the guest room and coming up in the next couple of days the finish work on the the main stairway from first to second. Nancy patiently did a super nice job finishing and sanding the stair treads five times over. They look great. Also, I think its fair to say that the painting is all done. There'll be some touch-ups here and there, but all the significant stuff, and most of the insignificant stuff is now done.

I've been continuing on the cabinets and am almost ready to start on the counter tops. In fact, my plan is to go get the material tomorrow and begin fabrication later this week. I'm feeling quite happy with how the whole cabinetry project is developing; as I've said before, this is new and fussy territory for me, so it is satisfying to see it work out well.

Oh yes, we've started lighting fires in the woodstove and it is just great. It's quiet, beautiful and puts out nice heat. We had to carefully light a series of small fires that "season" the stone and burn off the fumes from the new stovepipe and stove enamel. It's wicked cozy. Last night the temperature got down to around -16 below zero, so it feels good to have the stove going. Even with the cold it just feels good to be in the house. The experience of this whole super-insulation thing so far is just an even, comfortable, and stable environment.

Wednesday, January 19, 2011

Cabinets and Trim

Adam at work on the casing around the pocket doors

Lining up the forstner bit with the pilot hole

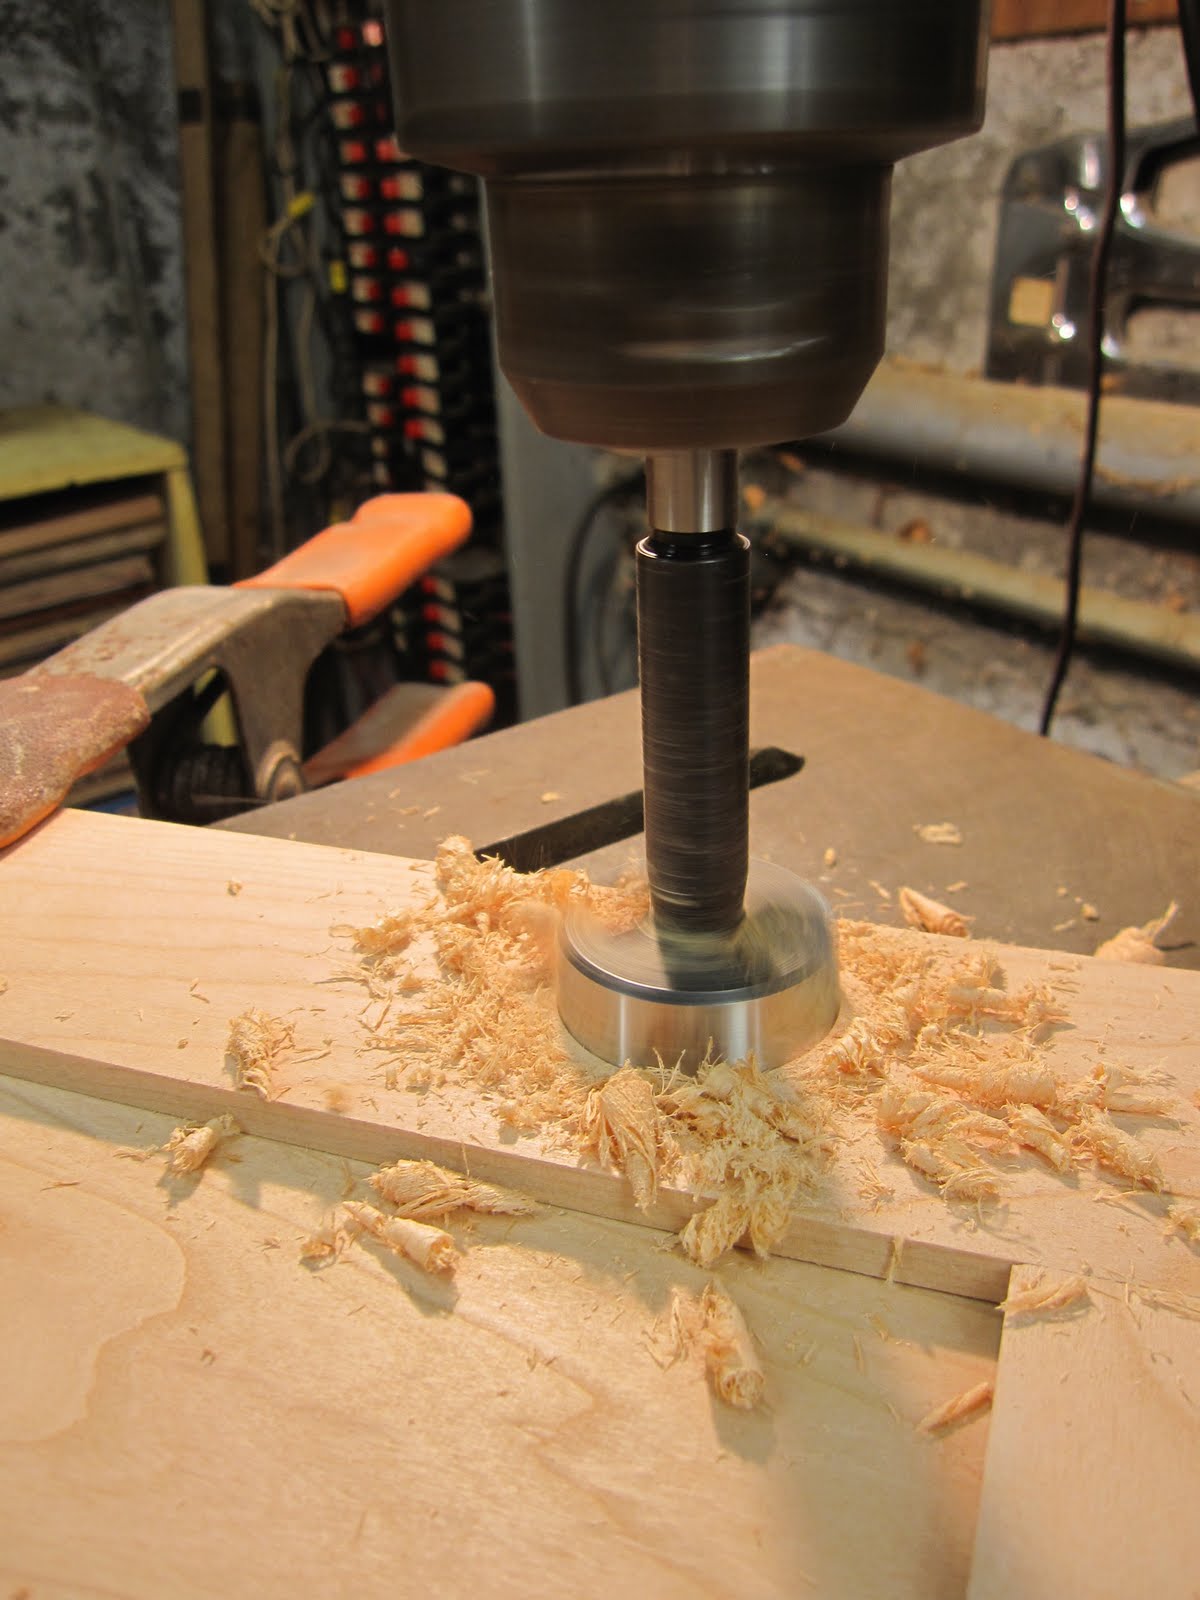
Drilling the mounting hole

Doors in place. Notice the red line at the top -- I've yet to adjust these doors so they all line up level

Here I'm using the laser to sight the height line for the drawer slides, one of which is mounted on the left

I've been working on the cabinets, specifically the doors and the drawers. Having never before built cabinetry in any real way I've felt trepidatious at some of the critical junctures. One of those junctures is marking, drilling, and mounting the doors. I spent a good bit of effort to make a couple of jigs that allowed me to make accurate marks for drilling. I tested one door before deciding that my jig was going to work and then after it worked fine went ahead and did the rest. The doors are all mounted with what are known as "European" hinges. They are quite common these days, but used to be somewhat exotic. The beauty of them is that they allow for adjustments in three directions (or more on some models), so if your doors are not all quite straight or a little off center or whatever, you have some room to correct.

I also mounted the slides for all the drawers and that went fine too. Actually, what made it really easy was Adam's laser level. I set it up, found my height and the laser shone its horizontal beam into all the bays of the cabinets and I was able to mark all my drawer heights super accurately. The alternative would have been cumbersome and of dubious accuracy. Hooray for laser levels!

Tomorrow I'll mount the drawers and then make the drawer fronts and finish the cabinet face frame inbetween the doors and drawer fronts. When I get to that point I'm basically done with the major work on the cabinets and will then been getting ready to build the maple countertops.

Working alongside me this week, Adam has been building the framed door passages at both the exit doors and between the office and living space, which is the wall that houses the pocket doors. He's done some nice work and these things all look like pieces of furniture. He'll probably have all the doors trimmed out tomorrow and then be on to running the baseboard that connects it all together.

Sunday, January 16, 2011

Stair Treads


Nancy spent a bunch of time today putting the first coat of finish on our cherry stair treads, which means more stinky stuff, but not nearly so bad as the smell from the floors after they got their coats of polyurethane.

Nance also installed the registers on the HRV air supply and return ducts. Its seems everyday there is one more little detail like this that says "finshed".

Adam is going to rejoin our effort again this week, so we'll see some good progress with both him and I working together.

Wednesday, January 5, 2011

Floors down

The pine floors installed. Notice also the woodstove is now set on the slate hearth. We'll get around to hooking it up soon. Oh yes, we also built a somewhat more expansive bottom step spilling out into the living space
Adam hard at work

The floor in process


Jake's tile work grouted and nearly done

Adam has been back up to help us out for the last two days and he and I managed to get the flooring down on the first floor. Due to some supply issues we went with 2" nails on the first floor instead of the 2 1/2" nails that Nancy and I used on the second floor. It was striking (no pun intended) how much easier the smaller nails were to nail in. Also, in a blessing from on high, the span of the main area of the living space on the first floor turns out to be just under sixteen feet wide and this allowed us to install our large stack of sixteen foot pine planking with no joints whatsoever on the first floor. I wish I could say I planned it, but I didn't -- it just worked out that way.

The next job for me is to set all the nails on both floors, which means hammering them with a tool called a nail set that submerges the nail heads roughly an eighth-inch below the finished the surface. This will make things good for next week when the floor sanding/finishing crew arrives to polish off the job.

Working alongside Adam and me today was Jake who is nearly done with the bathroom tiling project. The last remaining detail is to caulk the corner joints and then we are free to hook up the all the fixtures and call it a working bathroom. Maybe that'll happen this weekend?