Showing posts with label doors. Show all posts

Saturday, April 9, 2011

Knocker


Our friend (and frequent blog commenter) Wendy sent us this great door knocker a few months ago. It took us a while to get the time to install it, but here it is. As beekeepers it's perfect. We are also seeing the bees out with the recent spring days, so the timing seems right. It's also just kinda fun and not too serious. Thanks Wendy!

I've been at work tidying up lingering items such as the rest of the track lighting in the kitchen, repairing a leaky water line to the garden stand pipe, building an integrated shelf and grow-light unit for a spring seedlings in the big living room window.

Tuesday, March 22, 2011

Door Knobs

A brass and porcelain combination in the upstairs bathroom door

A brass assembly in the first floor bath door

The latch mechanism. I buffed out the rust, put in some grease and put it back together. It works great


Mortising out the opening for the mechanism

Last weekend Nancy, our friend John, and myself went antiquing and among the items we came across were some nice antique door knobs. I've been holding off on drilling the holes in the bathroom doors until we decided on the knobs and mechanisms because old mechanisms are a different size then modern ones.

I mortised out the space for the barrels and then fit the knobs. The porcelain set we've installed in the second floor bathroom door came with a connecting rod that was just a little too long. Faced with this I called up Felton next door and asked if he might have any of these common, but old-style, connector rods. Lo and behold he did.

It delights me that some old door knobs from who knows where are now an integrated and useful part of our home and will be for years and years to come. In part with this is that rod that's been sitting in a coffee can of Felton's for years, maybe decades, and is now found a new life in our house. So cool.

Otherwise, I've fixed up some plumbing issues that were needing attention and wiring up light fixtures.

Tuesday, November 30, 2010

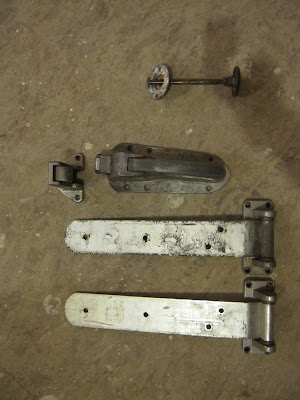
Root Cellar Latch and Hinges

The latch assembly

The latch, hinges and inside-release push rod

The root cellar door as it is presently configured. A latch and some honkin' hinges'll round it out, eh?

After trolling for months on eBay I finally found (and won for about $40) just the sort of handle and hinge arrangement I've been hoping to find for the root cellar door. I worked for a bunch of years at a Whole Foods Market doing various physical plant kind of stuff and was familiar with this sort of hardware meant for big heavy doors. Since we built the root cellar I've been inspired by the "antique cooler" vibe and knew I'd come across the right hardware sooner or later. Buying this sort of thing new you'd pay a couple hundred dollars just for the latch assembly; probably the same again for the hinges.

The rod with the round disk at the end is a push-release that allows someone inside the root cellar to activate the latch and let themselves out if somehow the door were closed with them inside. A nice safety feature.

We've got a lot going on right now and installing these parts is not super high on the priority list, so I'll look forward to putting them on when there is a little more time. They came from someone out in California. I wonder what their story is.

Tuesday, November 9, 2010

Doors and Cabinets


I sorted out all the various plywood parts I cut a week or so ago and assembled the kitchen cabinet boxes today. It went quite smoothly and everything fit together as it should. Tomorrow I fix everything in place and start in on the face frame.

Meanwhile, Felton was back continuing work on the electric and has the house nearly all wired up. The one missing element is light fixtures which we have yet to either make or purchase, so for now he is installing your basic porcelain-base fixture so we can have light until we sort out our fixture choices.

Joe wasn't here today but spent the last few days previously installing the interior doors. We all think they are quite handsome.

The tub got it's first coat of yellow-orange. We're diggin' it.

Thursday, October 28, 2010

The Clawfoot Tub

The claw foot tub post-scraping, pre-primer

Semi-cryptic info cast into the bottom

Electrical insulators waiting to be turned into lamps. I am super excited about this little project

The cabinet bases

This afternoon I scraped the loose paint off of the claw foot tub we'll soon be installing in our upstairs bathroom. Until today I don't think I ever looked at what the works cast into the bottom of the tub. Here's what it says:

Richmond
5 -26
6 6 38
D-5

My guess is: The maker is Richmond, the size is 5' x 26" (this is pretty clear because those are in fact the overall dimensions), it was made on June 6th, 1938, and maybe D-5 is the lot, batch or style number? If my assumptions are correct, I'd be just so happy to know that this tub was made in 1938. I would never have guessed, but then again these things really don't age, do they? In addition to the above info, there is a number by each foot attachment point specifying the correct foot placement, 1 through 4. After scraping off the old paint, I gave the tub a coat of primer. After another coat we'll then give it it's groovy orange finish coat.

I acquired this tub from a former colleague in Boston who, if I remember correctly, got it from somewhere in New York, but I'm not sure about that. Either way, I love that this antique will continue to live on in our new house.

Speaking of antiques, I received a large handful of vintage electrical insulators in the mail that I purchased cheap on eBay. A couple were broken when they arrived, but for the price I'm not sweating it. Mostly I just wanted to get some of these in hand to start experimenting making lights. Joe also brought a nice one from his place for us. I'm excited to start playing with these things.

Joe is nearly done with the window project and will soon start on installing the interior doors. It really feels like things are moving along.

Meanwhile, I have the kitchen cabinet bases built. I still need to fix them to the floor, but that'll be easy and then I'll start on the cabinet boxes.

And lest I forget, Felton has been here most afternoons lately steadily hooking up all the wiring. He methodically worked through the outlets first and is now most of the way through the switches. I know when I was putting in the wires there were times when I wondered if it all was going to make sense when push came to shove and things got hooked up. So far so good. It's going to be really cool to flick a switch sometime in the near future and presto, a light will come on.

Right, one more thing about the tub. Way back two winters ago I went down to the little storage shed that the tub was in and tried as best I could (without actually pulling the tub out and assembling it) to figure out it's standing height so that I could plan the height of the sill in the bathroom to match. Today, with the tub on sawhorses, I attached one of the feet and checked it against the finished window sill. Sill height: 21". Tub height: 21". Yes.

Tuesday, September 7, 2010

Project Doorway

The door frame as it stand now...

I've spent the last two days working out how to frame the door on the west wall. I habitually rubber-neck old houses for details and have spent a bunch of time thinking about the possibilities, but when the time came hadn't actually worked out a definite design. In retrospect it would have been profitable to spend some time drawing before launching into actually building the details. With most of the details on the house I've felt fairly confident and almost casual about what direction to go--I've trusted my take and generally just moved ahead and it's worked well. This door project proved to be a different story.

Right off the bat I could tell I didn't really have a sense of direction. I forged ahead anyways and just started putting pieces up, taking them down, cutting them to different lengths or widths in an attempt to sort of collage together a direction.


Some scholars claim that hot-glue was used periodically by the Greeks when constructing temples

I realized in doing this I was squandering fairly good material that I might not actually use in the final product, so instead of cutting up perfectly good wood I started hot-gluing scraps together to lengthen a piece I cut too short, or gluing on a little piece to see how it looked. I spent may hours yesterday doing this and at some point lit upon the idea that the architrave-frieze section could have a dentil molding that referenced the roof lookouts. (See the drawing below to clarify what these names refer to). This got my sense of direction going a bit and by the end of the day on Sunday I felt like I was at least moving towards a solution, but knew also that it wasn't quite right. This was more or less where I ended up yesterday:


Results of day one

Today I went back at it and again spent considerable amounts of time working on this little project. At some point I stepped into the yurt and typed "Greek revival doorway" into Google and checked out what came up. The following drawing caught my eye and helped me move forward a bit. I've added the names of the various parts to help clarify what's what.


When I saw this drawing it helped me realize that rather then adding the little horizontal detail at the top of the "columns" (the vertical pieces on either side of the door) I needed to add a cornice-like section to lift the whole thing up a bit from the top of the door.
That got me here:


At this point I felt like like I was on the right track and so started to actually build and install the
finished product. By the end of the day I had the project all up and complete and decided to let it sit for a little while (see picture at top). The top pieces are screwed in, so I can take them out and mess with it all a bit more if need be.

Though I love this sort of work, this whole thing just didn't come easy.


Thursday, June 24, 2010

Punch List

Joe, piling up the exterior window frames


A particularly fancy doorway in the village

Our phone line nexus point. Yes, that's a braid

An air-sealed electrical box mounted on the exterior of the house

We're taking care of all the odds and ends that need to happen before we literally wrap up the interior with a fabric called Insulweb in advance of insulating.

Joe's working steadily on the window frames and will soon have them all set to go up. Having Joe working on the window casings has caused me to realize that I haven't spent any time yet thinking about what the exterior trim detail around the doors will look like, so today I did a brief tour of various house doors around the village. Most of them are more ornate then where we'll go, but I had a few ideas.

Otherwise we are working on lots of things like electric wiring, phone lines, duct perforations for the kitchen hood, sealing up air holes in the house, etc...


Tuesday, February 16, 2010

Wiring continues


I've spent the last couple days continuing the wiring. It's going pretty smoothly, with a question here and there for Felton to make sure I've got the right idea. Its taking me longer then I would have guessed once I got started, but I think I'll have the lion's share in place tomorrow or the next day.

After that I'll probably start in on the basement stairs or the office walls to take up some time before Paul and I take up with the plumbing.

Today I ordered the parts I need to build a set of pocket doors going from the living room to the office. I think it'll be a nice way to have the option of privacy or openness between the two spaces.

On a different front, Nancy and I spent 1 1/2 hours yesterday afternoon at our local appliance and fixture store contemplating washing machines, stoves, dishwashers, toilets, etc... there's a lot to figure out and we are hoping to make a bunch of purchases on March 6th, which is a "tax holiday" here in Vermont. Wish us easy decisions and harmonious discussions!

Thursday, January 21, 2010

The five inch move


I chalked out the walls on the first floor. The space in front of the door will be the mudroom. The area where the table saw is sitting will be the bathroom, and the plumb bob (the pointy weight on a string) is hanging from the stair opening on the second floor to check that it is in line with the wall of the bathroom. It is.

Here's the first floor plan again for reference to make sense of the lines above. The photo is taken near the bottom of the stairs facing towards the doorway in on the right in the plan. (Remember to click on the photo for a clearer view.)


See how the lines on the floor run right into the door? No good. These lines represent the wall separating the mudroom from the kitchen. Correcting this requires moving the door about 5" to the left.

The opening with the door removed

New framed opening done, starting re-installation

Yesterday I laid out the interior walls in red chalk on the floor and confirmed what I was already aware of, which is that having chosen a 3'-0" wide door instead of the 2'-8" door that I'd originally drawn, the door was butting into the wall between the mudroom and the kitchen.

The options here were to either have a slightly bigger mudroom and slightly smaller kitchen, or to move the door. There really wasn't much of a question. Move the door. So, what has mostly been "building" made a slight detour into "renovation". I had to take out the door, reframe the opening 5" inches to the left of the original, and then reinstall the door in it's new location. Easy to describe, but a lot of work to do.

Nonetheless, by the end of the day today I had it back in and fitting nicely, so tomorrow I'll finish up the loose ends of the project and go into coming up with a framing plan for the interior walls, order up some lumber and put 'em up. That should be fun.

Thursday, December 17, 2009

Root Cellar


Today we wrapped up a couple of day's work with me building the door and Joe building the shelves for the root cellar. Previous to this we insulated the shared walls between the basement and the root cellar to isolate the warmth of the basement, such as it is, from the root cellar.

I'm quite happy with the both the door and the shelves. My inspiration for the door was the typical design of a walk-in refrigeration unit such as you'd see in the back rooms of a restaurant or supermarket. They are big insulated doors which have a really wide flange around the perimeter of the door that mates with the outside wall when the door is closed. We installed the door and it worked smoothly; when you are in the root cellar you see nary an inkling of light, so it seems to seal pretty well. With a couple more tweaks it'll be just right.

Joe's shelves are beautifully crafted,industrial strength, and sized nicely for the various canned goods we will be storing. At this point we have shelves on two sides of the root cellar with room for more should we decide at some point we need more storage space.

I'll build a sliding latch for the door at some point, but for now I'm just glad we have a functioning root cellar that allows us to finally store our various goods such as saurkraut, olives, canned tomatoes, ketchups, chutneys, carrots, beets, cabbage, potatoes, celariac, and many other goodies. It is a treat to finally have the root cellar in operation. The temperature in there this evening was 37 degrees. The temperature outside is hovering just around zero. Fun.

Oh yes, we also put in the door on the west end of the house facing the garden. It looks great with the funky green color we've chosen and it sure beats the plastic tarp we were getting by with.

The wood stove has proved to be a godsend. With very low temperatures it makes working in the house bearable, if not quite pleasant if we get it really fired up.

Upcoming: The electrical panel goes in; the roofers come to install the standing seam roof; Joe and I begin building in our secondary perimeter walls along the inside of the house.

Stay tuned...

Sunday, December 13, 2009

Woodstove

The Jøtul 4 doing it's work...

...me doing mine...

...and the stovepipe its

Joe and I installed the woodstove and most of the stovepipe on Friday, Nance and I picked up the one last piece of pipe we needed on Saturday, and today I fired up the ancient Jøtul woodstove we inherited with the property. I'd never really paid much attention to this stove; its been sitting in the corner of the garage for many years.

Once we had it in place in the house I was better able to appreciate its stately good looks, and once I'd fired it up, I was certainly able to appreciate its ability to warm up a frigid house.

After a couple hours of burning out the dust and breaking in the new pipe, the stove and I settled in for some comfortable work in the house. I'm working to get the paint/urethane finish on the garden-side door, so we can put it in the frame and be able to properly close the house. All the other doors and windows are in and good to go, so this last door is the final element to go in.

It was peaceful to be able to work in a warm, comfortable space with some relaxing music on and the snow swirling outside. Already I feel a sense of what its like to inhabit the house and it feels really really good.

Wednesday, December 9, 2009

Windows and snow

A visitor...

The door opening is covered in plastic while the door is awaiting its paint job

North side of the house--done

Today we charged ahead getting windows in. We tackled the high ones off the second floor on the back of the house and it all went fine, despite heavy swirling snow all around us. Today we got our first significant snowstorm of the season and now have maybe 8 or 9 inches. It felt like window by window we were truly inching out mother nature's ability to get into our house--no more wind or snow drift.

Tomorrow we'll put in the last three windows and the door that leads out of the basement to the hatch. After that we'll install the big old woodstove from the old house that once stood here to take the chill off inside while we work.

Saturday, December 5, 2009

Before the snow...

The back (north) side of the house. The bulkhead is lower right

Our new door

Retaining walls with partial gravel fill--more to come


We spent a couple of days last week building the retaining walls on either side of the basement hatchway. Its been on the to-do list for a long time, but it hasn't been pressing, so it was only now that we got to it. With the retaining walls in place, we can level and fill the ground adjacent on either side, which provides level ground for staging to install the windows on the back side of the house.

We also installed the entry door off the porch. As soon as it was in, I took it out of the frame and down to the basement for painting and finishing. Its a beautiful douglas fir door and we're quite pleased with it. Nance suggested that we paint the exterior a shade of green we'd considered for the exterior of the house and so that's what we are going with. Its a cool color. Stay posted for the unveiling.