Showing posts with label super insulation. Show all posts

Sunday, December 1, 2013

Numbers


I recently gave a presentation to the Super Insulation class at Yestermorrow Design/Build School about building and living in our house. This presented a convenient opportunity for me to take stock of the building process, consider our experience living in the house so far, and to put together some performance numbers. We've been in the house just under two years and have established a track record for firewood consumption and are starting to get some reliable numbers on our propane and electric costs.

When our home was completed Efficiency Vermont (the state energy conservation organization) tested and evaluated our house for energy performance and determined a HERS number, which was presented as a part of their evaluation. HERS stands for Home Energy Rating System and is the standard methodology for comparing performance across buildings and regions. Many factors go into the rating system, including air-tightness, window performance, efficiency of the appliances, lighting and heating systems, as well as design specs like insulation R-Values and so on. The rating is adjusted for climatic conditions in a given location.

This is a generic chart showing the HERS rating scale. The "This Home 65" has nothing to do with our home.

In the above chart, 100 equals the energy use of a new home built to conventional standards in 2006. This is used as a base line by which to evaluate the spectrum of performance across buildings.  A rating of zero means the house requires no energy at all, while a rating over 100 means the house is sub-par in relation to current norms.

Our home earned a HERS rating of 38, which is a "5 star +" in the star rating shown below.  The scale somewhat curiously goes from 1-5 stars and then has a + category.  (Maybe they needed to add a new category as more efficient homes are being built -- I don't know.)


The HERS rating laid out estimated energy use predictions for our home as follows (calculated in 2011):  
             26.6 MMBtu heat  $990
             10.1 MMBtu hot water  $375
             17.9 MMBtu lights & appliances  $704
             HERS estimated annual energy cost:   $2,188

Based on our actual usage, these are our costs:
           $100-$150/yr firewood
           $750 propane hot water/cooking
           $768 electric

           Our actual annual energy cost:   $1,668

In the nearly two years we've been living in the house, we have only heated by wood. There is the radiant system in place should we ever choose to use it, but for now we like heating by wood; it's easy and feels good.

Although we know from experience that our heating expenses are tiny, it is useful to see them laid out together with the other home energy requirements. We plumbed the house in preparation for installing a solar hot water system, and seeing these numbers is a good motivator for costing out the completion of that project. It would feel good to bring the hot water energy numbers down. 

Monday, March 5, 2012

Wood Use Check-In


This week we are just finishing up burning a total of 1/2 cord of wood so far this season.

(Since our wood is all cut to 12" long, it is easy to quantify the volume of wood we stack between the posts on the porch. I have a mark at the height of a quarter cord and can easily mark the heights for fractions of that quarter cord.)

Last night Nancy and I discussed how much more we should load onto the porch. I suggested another quarter cord, or maybe an eighth. We settled on a sixteenth.

With the strong sunshine at this time of the year along with warming temps it just doesn't seem like we'll burn too much more wood.

Now that we are beginning to understand our heating requirements the information allows us to consider how we might source our wood needs. In the years we lived in the yurt we needed so much wood (about 3.5 cords per season) that cutting it ourselves was not really a consideration. Harvesting a half cord just doesn't seem so hard so its interesting to think about harvesting our own wood supply from the surrounding woods.

Saturday, January 14, 2012

Wood Use


Later on January 14, 2012...our second 1/4 cord stacked


January 14, 2012...the last of our first 1/4 cord


January 1, 2012...roughly an 1/8 cord


September 24, 2011...our first 1/4 cord

Its been fascinating to monitor our wood consumption this fall and winter.

By New Years Day we'd used just over an 1/8th of a cord which you can see in the middle photo above. Now, two weeks later we've used most of what was left. This means it's taken about three and half month's to go through a 1/4 of a cord to heat a 17oo sq. ft house.

Of course it has been a mild fall, so this may not be indicative of future use, but it starts to lay out a pattern for us to plan around. January and February are the coldest months of the year and it will be interesting to see how much wood these months require. It seems like a reasonable guess that we won't go through more than a cord total for the year, but we'll see when all's said and done.

(I've spent some time trying to figure out a way to present energy use in comparable terms and I'm not there yet, but I want to work it out so it can be presented in a way that would allow comparisons with other forms of fuel, house size, and energy efficiency.)

In dollar terms we paid $200/cord in July for the wood we have on hand now. Roughly this translates to about $50 to heat our home so far this heating season.

The quarter cord we are just finishing burning is a couple years old, so its delivering more btus/kwhs then the woodstack we are about to start using which has not had time to fully season. The new wood was (presumably) cut and split in the middle of the summer since we had it delivered at the end of July. After this season it will be easy for us to maintain a seasoned wood supply by having one dry cord to burn and stocking up a green cord each summer.

Sunday, February 20, 2011

Chilaxing

Sunday Times by the woodstove after a ski

The gang chilaxing

Our first official meal. Hooray!

This weekend we had the privilege and the pleasure of hosting our first house guests in our "new" house, and it was a terrific experience.

Michael, Anu, and Scott arrived late Saturday morning for a lunch before we all headed out on either a back-country ski or a walk. The weather has been blustery and cold and after a few hours out, coming back from the surrounding hills we found house was as welcoming and warm as we could ever dream. A small fire in the woodstove and warm-up shower thoroughly defrosted as needed.

Anu cooked us an excellent Indian diner and the kitchen served us well. There's still lots of organizing and such to get in place, but the basic experience is solid.

In a really neat twist of fate, Michael and Anu were some of our first guests when we moved into the yurt almost eight years ago. We were glad to have them here again celebrating with us.

This week I'll continue working on the various small projects required polish things off for the final inspection from the appraiser. This includes a shelving unit in the kitchen, some finish work over the stairs, a cap on the railing and some trim work around the t.p. holder/storage cubbies in the bathrooms. Oh yes, also I'll be working on light fixtures.

Friday, February 18, 2011

Keepin' warm

Sunlight on cabinets

The stair railing

The thermostat control

Today we decided to turn our thermometer down to 50 degrees--effectively turning the heat off. It's been in the back of our minds to do this for a while but with our efforts concentrated on just getting the house done it's been easier to let the boiler/radiant system keep the place warm. With the wood stove hooked up and a little more available attention to spend on our wood supply and lighting a fire as needed we thought we'd nuke the back-up heat and see what happens. Mind you it's been unseasonably warm the last couple of days, but it's supposed to cool back down again tomorrow and stay that way for a while. I'm fascinated to see how the house performs.

I got the railing mostly built today. There are some odds and ends to finish up and the whole thing needs a finish railing cap to top it off, but it came out pretty well. To do it again I might make the triplets of balusters a little closer together to accentuate the groupings, but basically I'm happy with it. Moreover, it's great to have a railing in place to do it's job of keep us safe.

Monday, January 24, 2011

...and we continue on...

The very first fire in the woodstove

Nancy doing some more of the painting following Adam having completed the trim inside the bathroom

The appliances sitting in place in the kitchen. The stove and the fridge are soon to follow, although nothing is actually hooked up yet, I just need them there so I can install the trim to match up correctly

This section cabinetry is very close to complete. A few more vertical trim pieces, fit the drawer fronts and that'll be it. Oh yes, we'll need knobs and pulls.

We've been making steady progress. Adam has been working through all sorts of trim-out projects that includes all the doors downstairs, a couple of doorways upstairs, a single step down into the guest room and coming up in the next couple of days the finish work on the the main stairway from first to second. Nancy patiently did a super nice job finishing and sanding the stair treads five times over. They look great. Also, I think its fair to say that the painting is all done. There'll be some touch-ups here and there, but all the significant stuff, and most of the insignificant stuff is now done.

I've been continuing on the cabinets and am almost ready to start on the counter tops. In fact, my plan is to go get the material tomorrow and begin fabrication later this week. I'm feeling quite happy with how the whole cabinetry project is developing; as I've said before, this is new and fussy territory for me, so it is satisfying to see it work out well.

Oh yes, we've started lighting fires in the woodstove and it is just great. It's quiet, beautiful and puts out nice heat. We had to carefully light a series of small fires that "season" the stone and burn off the fumes from the new stovepipe and stove enamel. It's wicked cozy. Last night the temperature got down to around -16 below zero, so it feels good to have the stove going. Even with the cold it just feels good to be in the house. The experience of this whole super-insulation thing so far is just an even, comfortable, and stable environment.

Monday, January 17, 2011

Dedicated Air


Air to supply the woodstove comes in through this duct hood...

...then passes under the first floor and up to the woodstove...

...then into a little add-on air-supply box under the woostove where the stove draws it's air. Once combusted, the fumes travel up the stove pipe...

...into the insulated pipe in the second floor living space and up through the roof...

...and back out to the great outdoors, having never mixed with the interior air

A key element required of a super-tight super-insulated house is insuring a dedicated air supply to all combustion. Likewise all combustion needs to have a dedicated vent route, also isolated from the interior air.

Two examples of this principal are the propane boiler in the basement which has a short in-and-out combustion air supply and the woodstove on the first floor. The woodstove, unlike the boiler, is located in the middle of the house so there is a good measure of ducting running from the outside supply hood to the woodstove and then exhausting from the wood stove up the stovepipe to the insulated stovepipe and through the roof. I've been quite careful to make sure the whole run is tightly sealed so that the woodstove is only pulling air from outside and only venting to the outside. I don't want any leaks.

The not-really-resolved aspect of this equation is the propane-fueled gas stove-top range. The air supply is the ambient household air, and the venting, such as it is, will be a hood mounted over the stove top. This will all work okay, but it isn't ideal. If we run the hood, we'll need to open a window or door to allow air in so as not to create a negative air pressure in the house which could then result in a back draft in the woodstove. We have carbon monoxide detectors on both floors even though they are not required by code since there will be a small amount emitted by the stove.

Monday, October 18, 2010

Temperatures

The thermometer shows the temp outside (48.4), the temp inside (61), the humidity inside (55) and then the time and date

This whole super-insulated house project is one big experiment in heating and energy use and I'm curious to see how the experience pans out. I'm also not sure what to expect. And so it is that I've been watching with interest how the house has been maintaining temperature over the last couple of months as the fall has progressed and the outside temps have dropped.

We have not yet turned on the heating system or started a fire in the woodstove, but I suspect we'll be doing so pretty soon. This morning was the first time the house dipped into the 50's after bumping around the the low 70's and into the 60's over the last couple of weeks. I'm pretty happy that we've been able to get into the second half of October without feeling the need to heat the house. I've lived in houses in Massachusetts where getting though September was always the big challenge, so being where we are I am pleased that we've not needed to heat yet.

To actually fire up the radiant heat system we need to get the boiler to sense demand via a thermostat which we have not yet installed. I'll be working on that tomorrow.

Today's weather held out the possibility of being sunny, which could warm the house up through solar gain, but at the end of the day it was still only around 61. I look forward to doing some solar gain experiments to see how much increase in house temperature we can expect on a sunny day.

On a related note, I've been keeping an eye on the temperature of the root cellar. Through the summer months of July and August the root cellar pretty much stayed constant around 60 degrees, but started to cool off through September down through maybe 55, and now in October has dropped a few more degrees. It seems to me that the root cellar responds pretty readily to changes in air temps outside, so I'm thinking that it might make sense to install smaller diameter inlet and outlet fittings on the air supply and vent pipes. They are currently 4" pipe and I think we could go down to 1" pipes and still provide enough air movement while constricting the rapid movement of large quantities of air.

Thursday, August 19, 2010

Big Day

The blower-door testing apparatus in place in the west door

Bill running the test

The readings

Sheetrock being lifted by the boom truck into the second floor

The first afternoon's work by the sheetrock crew

Lee and Lou hard at work painting clapboards

The wooden drip-edge detail

Today was exciting on a number of fronts.

The sheetrock crew arrived and got to work, making quick work of getting the first sheets up after spending a few hours loading. Its clear they are good at what they do and its feeling like the right decision to have hired this job out. They'll be back tomorrow and Saturday and expect to have all the 'rock up in about three days.

Even more notable was the results of our blower-door test performed by Bill Hulstrunk. Everything was buttoned up that I could think of and Bill gave the house a go.

The results were excellent. In fact Bill said that this was the tightest house he has ever seen and says he's tested thousands of houses. Its hard to rate the performance other than the numbers: from what I understand, an average house about the size of our house would come in at approximately 2000 cfm at 50 pascals. Ours hit 240 cfm at 50 pascals. For the record, his machine couldn't actually measure as low as the number that the machine was trying to register, alternating between "lo" and various numbers in the neighborhood of 230-240. This is as good as could have ever hoped and I feel deeply satisfied to have reached this milestone.

Toiling away out of the limelight, and trying to stay in the shade of the house were Lee and Lou, Nancy's parents, who are up visiting us and doing some great work painting clapboards. Way to go Lee and Lou!

In other news, Joe and I installed the wooden drip edge yesterday. This is a piece of molding that sits on top of the water table. Its a detail that matches the molding at the top of the window frames and ties the whole look of the exterior neatly.

Saturday, July 31, 2010

Wrapping up Insulation

The temperature chart in the root cellar

My insulating get-up. Note fangs

Insulating the walls and ceiling of the root cellar

The rim joist area before blowing the cellulose in the hole

Insulating was a lot of work and we finished it up on Thursday. This included insulating the root cellar roof and walls so that the earth temperature is the predominant heating/cooling force in the space. I tracked the temperature in the root cellar over the course of the spring and stopped early in July when it seemed to have leveled off around the high 50's/low 60's. I'll be very interested to watch what happens to the temperature now that the surface earth temperature is mitigated and the deeper-down earth temperature remains unhindered in its exposure.

After a couple of different tries I finally settled on wearing a dust mask, swimming goggles and a cycling cap to ward off the worst of the cellulose insulation blow-back in my face. Just as the cavity being filled nears capacity, there is often a powerful backwards shot of insulation that shoots right back towards the person doing the insulation. Its only manageable if you are well protected.

The last bit of house insulation was doing the spaces around the rim joist under the first floor--basically the band of area that is the first floor/attic ceiling around the perimeter of the house.

At this point the house is finally insulated, but we are going to do a just a little more cellulose blowing-in in a couple of spots, namely the walls of the bathrooms and a few inches under the second floor. This will be done for sound attenuation purposes. We want to minimize the sound transfer between the first and second floor and the bathrooms. Its not too much work and we decided that we'd just do it even though its a little more effort.

Wednesday, July 21, 2010

Way deep in insulation

Me, in a state of dusty exhausted misery

Nance getting in on the action gluing the Insulweb on the first floor

Apparently the newspaper is pulverized before becoming cellulose to the point that you aren't supposed to find individual letters, but Joe found this plus a couple of other semi-discernible bits of type. I love that our house is going to be kept warm by newspapers

Before we started blowing-in on the first floor

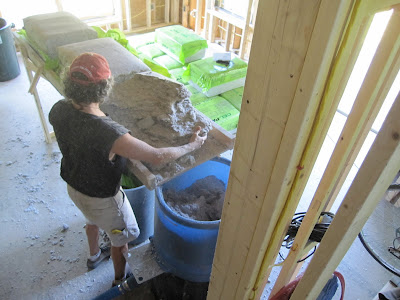
We've been working really hard on the insulation process. At first it seemed easy, just blowing in tons of cellulose and filling up all the wall and roof space, but then it got much harder when I went back to do the second pass where we bring the cellulose up to the optimal 3.5 lbs. per cubic foot density. This requires reaming the 2" aluminum supply tube into the same nebulous mass again and again and again until you feel like you can't do it any more and then doing it a little more on the chance you missed something.

This is all done at really awkward angles either above your head or at your feet up in the rafters with dust everywhere, an inadequate dust mask over your mouth and a plastic face shield on to keep cellulose from blasting into your eyes when you pull the insertion tube out of the ceiling for the millionth time. Blech! I'm not really for complaining, but this was one job where I just felt like it was an act of will to keep going and do it as well as I could.

The second floor is basically complete, and that was the worst of it. We are in the middle of insulating the first floor and there is much less volume to fill, so its going much quicker, plus its easy to do this work when you just need to stand next to a wall--unlike the complicated mess upstairs! We'll have the first pass on the first floor done tomorrow.

Friday, July 16, 2010

Insulation

Me, blowing in cellulose on the first pass. In this light you can see the partially filled bays. The hose goes back downstairs to the blower being managed by Joe

Joe preping the cellulose and keeping the hopper filled

Joe's tally of our progress, bag by bag (roughly 200 so far)

The walls after our second pass to bring the density up to the 3.5lbs per square foot that we are after. Almost looks like a mattress, doesn't it?


We've spent the last three days insulating the second floor. The process is this:

  • Loosely fill each stud bay and rafter bay with insulation a full as possible but not trying to reach finished density
  • Once done with step one, go back through and work filling all bays again until finished density is achieved. When you've got it right, the wall feels a lot like a firm mattress.

The way this is done is with two people working on coordination. Joe is on the first floor loading the endless bags of cellulose into the hopper of our blower which then propels the stuff through a long flexible hose that I am managing on the second floor. With me as well is a small switch control that allows me to turn the blower and mixer on and off as needed. Joe has a set of these controls as well.

At the end of the flexible hose is a 4 foot length of pointed aluminum pipe which I use to pierce the insulweb fabric and inject the cellulose. It is almost identical to vacuuming in reverse. It takes hours and hours of work and a lot of thought about what you know is happening in the walls but cannot see once you've started blowing in the cellulose.

Its so great to be doing this work and it is remarkable how it changes the feel of the interior. It is now quiet in a way that is sort of like "being in a cotton ball" as someone described it. It feels really good. Its also neat to be doing work that is pivotal to the whole process in terms of making good on our energy performance goals.

Tuesday, July 13, 2010

Insulweb instal

I had to go to an office supply store to find gallon quantities of Elmer's Glue, our current means of attaching the Insulweb to the framing

Putting up the Insulweb fabric

The second floor almost complete

We are continuing to put up the Insulweb retaining fabric and its going just fine. The second floor is the more complex part of the house to do and we have just a little more work to do there tomorrow morning and then we'll start actually blowing in the cellulose insulation. For those who may be unfamiliar with cellulose, it pulverized newsprint that has been treated with a borate for fire retardancy, mold and pest control and just small amount of mineral oil to help keep dust down.

Sunday, July 11, 2010

Super-Insulation class visit


This morning the Super-Insulation for Zero Energy Building class from Yestermorrow came to take a tour of the house. I took this class a year and a half ago and it was pivotal in solidifying the direction we wanted to go in designing our house; there is greater up-front investment in a super-insulated home, but the payback is rapid and the long term savings are remarkable. The information in the class made that unmistakeably clear. There are multiple benefits beyond just the financial, but suffice to say that I credit the class with convincing me that it would have been almost irresponsible to do anything less then we were able in making our house as energy efficient as possible.

I gave a brief overview of the features of the house; stack framing, the double-wall construction, air sealing efforts, the boiler, the HRV (Heat Recovery Ventilation) unit, the root cellar, and the overall effort to reach high R-values throughout. There were a bunch of questions and it was a good give-and-take.

Its great to be able to share what we are doing in a useful way.

Thursday, June 24, 2010

Super-Insulation Symposium


Last night Joe and I rode bikes down to Yestermorrow Design Build School to attend a "Super-Insulation Symposium", held as a part of the Wednesday evening lecture series.

There was a panel of speakers who all gave brief presentations about their experience with super-insulated houses. I noted at some point that I went with a hair of apprehension that I might hear some bit of information that would up-end some critical aspect of the project or otherwise cause me to doubt some part of the house design. I'm glad to say that on the whole the information presented was a ringing endorsement of the choices we've made, and in fact I felt really proud and grateful that we have the opportunity to be doing this project in the manner that we are.

Among the panelists were Alex Wilson, of BuildingGreen, who moderated; Andy Shapiro; Robert Riversong, a builder and designer who I worked with two years ago building Larsen Truss-style super insulated house; John Ungar-Murphy of Cell-Tec insulation; Peter Schneider of Vermont Energy Investment Corp; and Bill Maclay of Maclay Architects and Planners. On hand as well was Bill Hulstrunk of National Fiber, a cellulose manufacturer, who has been generous in helping me along the way with questions and advice.

We spend lots of time toiling away on this house project and a lot of thought, planning and consideration has gone into making it as high-performing in terms of energy-use as possible. It was great to get away from our project to see and hear from others who are working very much in the same vein. It reminded me that we are really doing something unique and, I think, important.

Of particular interest was the concept of a thermal solar storage unit as a heat resevoir for over-capacity solar hot water energy. The basic idea is that you have this delivery van sized extra-super insulated cube buried in the ground which becomes a thermal mass heat "battery" that gets charged any time the sun is out and the solar hot water collectors are active. I'm not doing a great job describing it, but the idea is potentially significant step in the quest for creating affordable zero-energy buildings. If this pans out, I could see this being something we'd give serious consideration to down the road.

Here's a kooky video about the TSS concept.

Wednesday, March 10, 2010

Plumbing continues

How to get a pipe in the house. Note the second hole to the left of the pipe

The pipe in place on the inside, one each through the two holes on the outside

The rigid insulation in the basement. You'd be surprised how many times I've whacked my head harder then I'd like on that white plastic pipe coming out of the wall.

I've been plugging away at the drain and vent lines.

What surprised me was that in order to get certain lines into place in the floor joists, you have to continue your line of holes right out through the side of the house. What do you do if you've built a house out of concrete?

I've been enjoying the plumbing work; you basically have a pile of fittings and you dry-fit them together with lengths of PVC pipe and when everything is good and they are pitched the way you want them, you glue them all together with nasty smelling solvent glue.

I've also been continuing with the insulation of the basement in advance of our HRV unit being installed. (HRV stands for Heat Recovery Ventilation and is the mechanism that will supply us fresh air, since the house will be highly air-tight and super-insulated. Without this system there'd be no opportunity for fresh air to enter the house, or stale damp air to exit. More on this later.)

Anyway, the HRV unit will be installed soon in the back corner of the basement and I want to have the insulation in place so I'm not trying to fit it behind the unit after the fact. Putting up the insulation requires hanging sheet plastic from the sill , taping the overlap seams of plastic (the red tape in the photo), then cutting the boards of insulation to fit over the pink board coming up from under the slab. I then drill a pilot hole through a piece of strapping and the insulation into the concrete and finally screw a concrete screw to hold it in place.