Showing posts with label kitchen. Show all posts

Thursday, December 5, 2013

Hood Hook Up

The completed project. We're liking the effect of the lowered hood

Long on our list of things to do to complete the house is hooking up our kitchen vent hood. I've dragged my feet on doing this for a couple of reasons: First, I always picture the vent duct as a big hole in our house where all sorts of energy loss will occur. Secondly, not having the hood hooked up has not seemed to cause much trouble in terms of either air quality or residual cooking build-up.

The opening through the wall

I mentioned this during a presentation I recently made to the Super Insulation class at Yestermorrow Design/Build School.  It was suggested by John, one of the instructors, that I really should complete this project because it has notable effects on home air quality. Just because I'm not aware of it doesn't mean its not there.

This shows the hood before I lowered it. The duct connections are partially in place

The hood with the ducting complete and the hood lowered

Feeling nudged in a way I needed to be, I spent the next day completing the hook up. This was straightforward since I'd installed the main parts during the construction of the house. The remaining work was completing the duct connection from the wall to the hood itself. Taking this on became an opportunity to lower the hood about ten inches to better capture the cooking smoke, steam, and particulate. When we first were putting the kitchen together I was concerned that the hood would look awkward suspended down in front of the window, so I hung it at the level of the top casing and it has sat there since, acting primarily as a light source for cooking.

The duct vent on the outside of the house. Its neatly tucked away, so you really need to look for it to see it. 
Time will tell if its going to create residue on the outside of the house

To our satisfaction, lowering the hood has had the nice effect of making things cozier in the cooking area. It creates a lowered ceiling and doesn't detract from the overall feel or the view out the window.

The hood is still a little higher than it should be, so I will work on it some more sometime soon, but for the moment I am glad to have the whole thing operating. We've been using it whenever we cook and I find myself suddenly sensitive to the potential harm of particulates in the air.

Incidentally, the hood came equipped with incandescent bulbs and this has always bugged me. I've wondered if I could replace the bulbs with fluorescents but never got around to checking. To my satisfaction I found it was super easy. I was a little uncertain because the bulbs have candelabra screw bases and I'd never had reason to see if they make fluorescents with them. They do, so it's no big deal. The switch is made.

The hood light with new fluorescent on the left and the stock lamp on the right 

Nance and I also discussed creating a housing to enclose the duct work, so we may make that happen too. I don't mind the metal tube look, but I think I'd enjoy a wooden enclosure as well.

Sunday, July 10, 2011

Cookin' in the Kitchen

Canning on the kitchen stove

Our scale

The end product

"Now I'll get to see if the kitchen works for canning."

So said Nancy as she began a long day of canning sour cherries and pickled zucchini. With our garden starting to produce, the annual canning and preserving ritual begins. This work is highly reliant on the stove and the kitchen work space. We managed in the yurt for years with a tiny little gas stove and a 3 1/2' wide counter, so clearly our new kitchen would be adequate, but would it all feel like it works well?

I'm glad to say after a few hours of sterilizing, boiling, warming and more boiling the verdict was yes, it works well. Our stove is obviously a good bit larger then our old one and the front-right burner is specifically a large-ring high-BTU unit intended for powerful output. When we are canning we are continually replenishing and reheating the large canning pot with water and it takes a lot of umph from the stove to keep it at a boil. Often in the past we'd be waiting some portion of the time just for the canning pot to get up to a boil again.

Spurdles

A collection of spurdles and rye

We have a small collection of spurdles that are now hanging in our kitchen. Some of the rye that we planted in the yard has formed its tassels and I was inspired to put them together.

What's a spurdle you ask? Why its a Scottish stirring stick of course! I believe they are typically used for porridge, but we use them for lots of things. Nancy got a bit of a spurdle collecting bug and now we've received a few different ones. The one second from the left was hand turned by our neighbor John Riley.

Tuesday, June 21, 2011

Solstice etc..

The house about 10 minutes after noon on the summer solstice

It has been a year since I first noticed how the roof shadow at the summer solstice lines up ever so neatly just after noon to reveal only the sun part of the sunburst on the south face of the house. This little event is a delight for me and today I was out there again taking pictures to document the moment.

Insulator lamps hanging from track over the dining room table

I recently made a couple more of the hanging insulator lamps. You may remember the one I made that hangs over our tub. My idea for the lights over the kitchen table was to have a series of lamps that will all hang at different heights and are made from insulators of different shapes. I'm pretty happy with the effect. The lights are dimmable, so the light can be quite intimate and candle-like.

The new motion detector light switch for the mudroom/pantry closet

This image shows the detection range of the switch (in blue). At some point it might make sense to move it so it is pointing towards the door so it registers movement right away, rather then after you start to move into the room

In other news, I replaced the conventional light switch in our kitchen/mudroom closet with a motion detector switch so we don't have to manually turn on the light every time we go into the closet. My previous plan was to install a push-button switch that would have been activated by the door itself, but that would have required a bunch of wall and trim deconstruction. The motion-activated switch was an easy and quick solution and it works really well. If you open the door and don't step in, nothing happens, but as soon as you move into the room the light comes on.

Friday, May 20, 2011

The Island

Our new old island

The hold-all box. We keep oils and such in there

The maple work surface and cherry shelf on the stainless base

It's always been our plan to build a kitchen island to round out the space and utility of the room and give the area a gathering point. Up till now it has felt a little too spacious because there has been that central piece missing. So it was something of a coincidence that my sister called us up and asked if we'd be interested in borrowing their old kitchen island for the indefinite future as they work on selling their current home and make plans to build a new house.

We jumped on the idea because although we fully intend to create an island when the time comes, its not currently at the top of our list since the kitchen is functional enough without it and things like shelves, screen doors, and places to store our clothes are a bit more pressing.

So, I went over earlier this week and picked it up and my 4 year old niece Solveig helped me load all the parts into the car.

It is turning out to be a really great addition to our home and I said to Randy on the phone after we'd got it in place that our motivation to go ahead and build our island just decreased by about seventy-five percent. It matches the wood types we have in our kitchen: a maple countertop/cutting surface, and a cherry shelf that matches the cherry cabinets. It fills out the general area of the kitchen really nicely and answers to what was a significant missing element in our overall plan.

Randy had this island put together after asking a restaurant supply house if they had a metal base that might work as an island and Liza found the cutting board at a yard sale, although it was a little to short to fill the full length of the base, so they had their friend Johnny built them a hold-all box to fill out that remaining space, along with the cherry shelf down below. I would never have thought to put in a box like that, but its great. It keeps the stuff you use all the time right in the middle of things and keeps the work/eating area of the cutting board clear.

The island also gives our groovy industrial stools something to gravitate around. They fit together well with the style of the the island.

Wednesday, February 23, 2011

Shelving unit


I've spent the last day or so building a shelving unit that mounts in the opening in the mudroom/pantry closet. It went together smoothly and today I installed the trim around it and the door right next to it. Because of the way the two trim casings meet it was some work to make it look like it makes sense, but the end result of having the whole thing in place is very satisfying. It finishes an area that has been rough and undone for months. What's more it gives us an important and useful place to put stuff.

We're actually thinking this particular shelving unit will be a trial-run for a more finer piece that would be a bit more elaborate and considered. We'll see how this works and decide what we think over time.

Sunday, February 20, 2011

Chilaxing

Sunday Times by the woodstove after a ski

The gang chilaxing

Our first official meal. Hooray!

This weekend we had the privilege and the pleasure of hosting our first house guests in our "new" house, and it was a terrific experience.

Michael, Anu, and Scott arrived late Saturday morning for a lunch before we all headed out on either a back-country ski or a walk. The weather has been blustery and cold and after a few hours out, coming back from the surrounding hills we found house was as welcoming and warm as we could ever dream. A small fire in the woodstove and warm-up shower thoroughly defrosted as needed.

Anu cooked us an excellent Indian diner and the kitchen served us well. There's still lots of organizing and such to get in place, but the basic experience is solid.

In a really neat twist of fate, Michael and Anu were some of our first guests when we moved into the yurt almost eight years ago. We were glad to have them here again celebrating with us.

This week I'll continue working on the various small projects required polish things off for the final inspection from the appraiser. This includes a shelving unit in the kitchen, some finish work over the stairs, a cap on the railing and some trim work around the t.p. holder/storage cubbies in the bathrooms. Oh yes, also I'll be working on light fixtures.

Thursday, February 17, 2011

Furniture and such

You can see the yurt through the window from whence this furniture came. Its a little bittersweet to be moving out of the yurt, but wonderful to be in the house

The kitchen up and running. We still need knobs for the cabinet doors

Close up of the cabinets

Making parts for the stair railing

Starting to fit it all together

We've moved bits of furniture into the house bit-by-bit over the last week or so. You'd think we were done or something!

I've spent the last couple of days working on the "temporary" railing around the stair opening on the second floor. I say temporary because I was unsure of what I wanted to do here and at some point decided I'd just do a quick black-metal pipe industrial solution that would allow me to feel out a nicer option with some more time to think about it, and that is essentially what I'm doing. That said, its' turning into a reasonably time-intensive project and might really end up being the foundation for the permanent version--we'll see. I guess I'm pretty distrustful of anything that is done as "temporary" or "for now" because quite often it becomes what stays for a long long time.

The kitchen is functional and we're really enjoying it.

Our first house guests arrive tomorrow. Before they arrive we'll be cleaning up and trying to get the house in shape for entertaining rather then building.

(Camera woes again: the lens is messed up on our camera, so I'm relying on our fallback which is the lower quality iPod Touch camera. I'm glad to have a back-up but look forward to getting our otherwise trusty Canon back in working order. Sorry for the sub-quality photos.)

Monday, February 14, 2011

Signs of domesticity


I completed the countertops today and that pretty much finishes off the kitchen for the time being. Phew! In a matter of hours Nancy and I were slicing up hors d'oeuvres and making diner in our fancy new kitchen. It feels so good. After dinner I loaded the dishwasher and cleaned up while Nance made a little fire in the woodstove and we shared a little Valentine's Day treat for dessert while we got all sleepy from the fire. We are feeling a lot of gratitude for such a comfortable home.

I'll be working on the stair railing tomorrow.


Saturday, February 12, 2011

We had a spider

Morning light on the stairs

A few more small parts and we'll be done for the short term in the kitchen

Another view of the stairs

Hooking up the sink and dishwasher plumbing

My efforts have continued in the kitchen the last few days, mostly hooking up the plumbing, making a back splash for the counter and enclosing/installing the dishwasher. Once the dishwasher was in and a last little bit of cabinet filler was installed on it's right side, we were able to move the refrigerator in from the yurt and finally have all our major appliances and fixtures in and operating. It is not much short of a miracle once again to be able to get water, heat it, make coffee and have refrigerated cream all right in one place and easy to access. I know it's normal and all that, but we've lived for a long time with water out of buckets and all that and now it's just so easy; it almost feels like some sort of embarrassing luxury.

One more coat of finish on the cabinet doors and drawer fronts and we'll call the kitchen "done", at least for a short while. I'll be building an island as soon as we are finished with our obligations to the bank, which should be soon.

Adam finished up a few days ago and now I'll be on my own finishing up the last few projects before we call it good.

Tuesday, February 8, 2011

Fun stuff

The sink looking all tidy with fixtures and an mineral oil finish on the counters. Note plumbing pieces in the cabinet underneath--water will not be flowing until tomorrow

Fitting the counter and creating necessary openings

This is the counter upside down--making the cut away that goes over and around the lip of the sink

Shaping the opening for the sink. The curved piece in back is a template that I used to router the curved edge

The last two stairs in place. Adam did a really nice job here

I've been working hard on the counter top project, which naturally leads into installing the sink, plumbing the supply lines, and hooking up the dishwasher. It all dovetails as the work progresses.
Shaping the counter tops was careful work and took some time, but it's looking excellent and fitting really nicely, so I am quite pleased. I spent most of today on the plumbing work and tomorrow I should have it all operating. Having our sink, stove, diswasher and fridge all hooked up and running will be monumental.

Adam came back yesterday evening and started up again today. He installed the last two stairs and they look great. Signs of finish everywhere!

Saturday, February 5, 2011

Saturday stuff

I was the recipient of an iTouch for Christmas and today I downloaded a free paint app. This is what I came up with

The counter top complete. Next up sanding and final shaping for installation

Messing around with railing ideas

Some of the cabinet doors Nancy is working on

Today was sort of a half-hearted effort on my part as I was sleepy and in need of a nap so I didn't get too much done. Nancy on the other hand has been powering through finish work on the cabinet doors, drawer fronts and cabinet frames. It's all looking really nice. Particularly with stuff like the doors its a lot of work to sand between each coat, but she's making good headway and should have it all ready to go in couple more days.

I completed the counter tops last night and today started in on sanding them down to smooth. Its not so hard as it is a matter of patience just sanding sanding sanding. They're gonna look good when they are done.

Thursday, February 3, 2011

Checking for square

The first two pieces joined

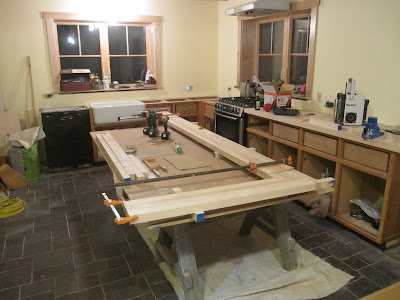
There's a lot of clamping, drilling, gluing and screwing in this process


Checking for square. You can see the overlap pattern at the corner. You can also see the first counter section that I built sitting in place on the cabinet--it still needs to be trimmed and sanded before installing

This is my little sketch that sort of shows the plan. There's a gap where the sink will be

The work at the end of the day. I should have the rest built up tomorrow

Today I started building up the second section of maple counter top. This one is a little more complicated then the one featured in the last post, since it encompasses the corner of the cabinetry. Usually, counter tops that turn a corner and cut at a 45 degree angle and joined. In our case we are going to build the corner into the counter as a unit. Adam had the excellent suggestion to "every other" the pieces coming in from each angle and sort of make a weave pattern at the joint.

It's important that the whole thing maintain a nice 90 degree angle so it'll fit into the corner well when its done and I'm glad to say that seems to be working out pretty well.

Wednesday, February 2, 2011

Maple counter, Cherry landing

Scraping glue drips off the maple counter top

The glue-up process

Adam admiring his work having just put down a coat of poly on the stair landing floor

Today I built up the first section of maple butcher-block style counter top. The process requires drilling out the pieces one-by-one with two different size bits, putting in an anchor screw, taking the screw back out, gluing both boards and then putting them together with screws--about eight holes to a strip of maple. It took quite a long time to build up the section I made today, but that's how it goes. I'm very happy with the result. All that's required now is to trim it to fit and install it.
Tomorrow I'll be working on the section that goes around the sink and turns the corner on the cabinets. It'll be a little more complicated, but after today's work I'm feeling confident about it.

Meanwhile Adam installed the cherry floor on the landing located halfway up the stairs. They look great.