Wednesday, December 23, 2009

The Standing Seam Roof


This morning the crew from Iron Horse Roofing showed up and began work installing the standing seam roof. Standing seam roofs are top-notch and last for decades and are particularly abundant here in Vermont. To get a longer lasting roof, you'd probably have to have a slate roof.

Just like it looks like in the photos, the roof consists of a series of long pieces of sheet metal with the edges on each side bent up to form a sort of very low wall on either side that lays up against the next piece that is shaped the same way. The mated edges from the paired up sheets are then rolled over to lock them into place, sort of like you'd see with two pieces of fabric that have been paired up, rolled over and then sewn together.

The company warned us that the crew would be showing up weather dependent. Well, this morning it was flurrying and the temperature was hovering roughly around 10 degrees. We wondered if they'd be coming, but lo and behold, they did. I thought later in the day, what would the weather have to have been doing to keep them away?

They may or may not be back tomorrow, but in either case will be back at the beginning of next week to finish the job off. It looks great so far.

Its going to be interesting to watch the snow careen off the roof the next time there is a snow storm.

Thursday, December 17, 2009

Root Cellar


Today we wrapped up a couple of day's work with me building the door and Joe building the shelves for the root cellar. Previous to this we insulated the shared walls between the basement and the root cellar to isolate the warmth of the basement, such as it is, from the root cellar.

I'm quite happy with the both the door and the shelves. My inspiration for the door was the typical design of a walk-in refrigeration unit such as you'd see in the back rooms of a restaurant or supermarket. They are big insulated doors which have a really wide flange around the perimeter of the door that mates with the outside wall when the door is closed. We installed the door and it worked smoothly; when you are in the root cellar you see nary an inkling of light, so it seems to seal pretty well. With a couple more tweaks it'll be just right.

Joe's shelves are beautifully crafted,industrial strength, and sized nicely for the various canned goods we will be storing. At this point we have shelves on two sides of the root cellar with room for more should we decide at some point we need more storage space.

I'll build a sliding latch for the door at some point, but for now I'm just glad we have a functioning root cellar that allows us to finally store our various goods such as saurkraut, olives, canned tomatoes, ketchups, chutneys, carrots, beets, cabbage, potatoes, celariac, and many other goodies. It is a treat to finally have the root cellar in operation. The temperature in there this evening was 37 degrees. The temperature outside is hovering just around zero. Fun.

Oh yes, we also put in the door on the west end of the house facing the garden. It looks great with the funky green color we've chosen and it sure beats the plastic tarp we were getting by with.

The wood stove has proved to be a godsend. With very low temperatures it makes working in the house bearable, if not quite pleasant if we get it really fired up.

Upcoming: The electrical panel goes in; the roofers come to install the standing seam roof; Joe and I begin building in our secondary perimeter walls along the inside of the house.

Stay tuned...

Sunday, December 13, 2009

Woodstove

The Jøtul 4 doing it's work...

...me doing mine...

...and the stovepipe its

Joe and I installed the woodstove and most of the stovepipe on Friday, Nance and I picked up the one last piece of pipe we needed on Saturday, and today I fired up the ancient Jøtul woodstove we inherited with the property. I'd never really paid much attention to this stove; its been sitting in the corner of the garage for many years.

Once we had it in place in the house I was better able to appreciate its stately good looks, and once I'd fired it up, I was certainly able to appreciate its ability to warm up a frigid house.

After a couple hours of burning out the dust and breaking in the new pipe, the stove and I settled in for some comfortable work in the house. I'm working to get the paint/urethane finish on the garden-side door, so we can put it in the frame and be able to properly close the house. All the other doors and windows are in and good to go, so this last door is the final element to go in.

It was peaceful to be able to work in a warm, comfortable space with some relaxing music on and the snow swirling outside. Already I feel a sense of what its like to inhabit the house and it feels really really good.

Wednesday, December 9, 2009

Windows and snow

A visitor...

The door opening is covered in plastic while the door is awaiting its paint job

North side of the house--done

Today we charged ahead getting windows in. We tackled the high ones off the second floor on the back of the house and it all went fine, despite heavy swirling snow all around us. Today we got our first significant snowstorm of the season and now have maybe 8 or 9 inches. It felt like window by window we were truly inching out mother nature's ability to get into our house--no more wind or snow drift.

Tomorrow we'll put in the last three windows and the door that leads out of the basement to the hatch. After that we'll install the big old woodstove from the old house that once stood here to take the chill off inside while we work.

Saturday, December 5, 2009

Before the snow...

The back (north) side of the house. The bulkhead is lower right

Our new door

Retaining walls with partial gravel fill--more to come


We spent a couple of days last week building the retaining walls on either side of the basement hatchway. Its been on the to-do list for a long time, but it hasn't been pressing, so it was only now that we got to it. With the retaining walls in place, we can level and fill the ground adjacent on either side, which provides level ground for staging to install the windows on the back side of the house.

We also installed the entry door off the porch. As soon as it was in, I took it out of the frame and down to the basement for painting and finishing. Its a beautiful douglas fir door and we're quite pleased with it. Nance suggested that we paint the exterior a shade of green we'd considered for the exterior of the house and so that's what we are going with. Its a cool color. Stay posted for the unveiling.

Tuesday, December 1, 2009

Windows go in

The supervisor wondering why I'm taking a photo and not working

Prepping the window openings

A window in

Jeremy and Sally holding the big window just before installation

The big window in place

Yesterday and today we've been installing windows and its going very well. As if on cue, the weather seems to suddenly feel raw and cold, with a persistent wind--a fine motivation to get those windows in! Its snowing this evening as I write this.

We started in the back of the house, on the first floor, with some of the smaller windows and have been steadily moving around to the front of the house.

Even the smallest of these windows are pretty heavy, so it takes some concerted planing to move them and get them into the openings. Each window opening requires a careful flashing detail before installation.

In our living room portion of the house we have a window that is something of a picture window that measures 6' x 6'. This creature weighs a ton and we knew we'd need some help. A phone call to Jeremy resulted in Sally, Jeremy, Anda, and Silas showing up to give us a hand. With all of them plus Nancy, Joe, and myself, we were able to carefully manoeuvre the massive unit into place. Getting that window in was a big hurdle and the rest are manageable by comparison. We'll polish off the the rest of the first floor tomorrow and maybe make a stab at the doors.

Every new aspect of the house brings a moment of anticipation and curiosity. Will we like it? Does it look like I thought it would? I have to say I'm really pleased with the windows; they look really good. Joe said they looked "old fashioned", which I took as a positive indicator of what I was hoping for.

Big thanks to Sally, Jeremy, Anda and Silas for showing up to help when we needed a few extra hands!

Sunday, November 29, 2009

Guest Carpenter


This holiday weekend we were graced with a little extra help. Nancy's dad Lou declared before visiting this weekend that he was interested in hammering a nail in the house. Before getting to the nailing bit we found a suitable location for our bird feeder sculpture and put it in the ground. Nancy said it was slightly premature to actually put up any bird feeders, but at least we have it ready.

From there, we went onto the nail thing.

We are done with the significant nail-intensive aspects of the project --at least for the time being-- but after looking around a bit I noticed there was some blocking that still needed to be installed. We got out the needed tools, cut up some pieces to fit, and then Lou went to town with the air gun. Having only wanted to put in one nail, he was ended up putting in maybe 30. Air guns are like that, they make it easy.

Thanks to Lou for some well installed blocking and a carefully considered location for the bird feeder!

Wednesday, November 25, 2009

Onwards...


We've been wrapping up some odds and ends as we pause for Thanksgiving.

I cut the rest of the star pattern in the porch roof, which we then covered with (painted) tar paper. The effect is definitely diminished, which I'm kinda bummed about, but I'm glad they are there nonetheless. I wish I could think of some way to have them shine without having a translucent roofing material. Any ideas?

We cut holes for three vent pipes that pass through the roof as well as the stovepipe for the wood stove. The stovepipe will stand higher then it is shown in the photo when we add another segment from below and push it up and out a few more feet. We also taped up a couple of leaks revealed by a recent rain and added some more ice and water shield in the roof valleys for a bit of added security against future leaks.

To my satisfaction we engaged in a bit of materials management. Back a couple of months ago I ordered the wrong kind of rigid insulation for the basement. Its been sitting down there waiting to be returned for a long time, so we finally hauled it all out and had the lumber yard take it back, along with various other materials that we don't need. We moved the remaining 6x6's that will be needed for retaining walls on either side of the basement hatchway to near where we'll need them. That has opened up some space around the house that starts to let us feel the building as an entity on its own.

Today I spent the whole day cleaning up, organizing lumber stacks, gathering tools, clearing clutter, stacking rocks, separating and storing burnable lumber, sweeping, etc.... It felt really good to take care of all this stuff. It puts a little order and polish to our hard work.

Nancy's parents are coming for a post-Thanksgiving visit and I'm excited to show them our work. Before they get here I want to cut out a hole to get to the second floor from inside. As it is now its a little high climbing from the outside. From the inside it'll be an easy climb.

The weather continues to be generous to us, for which I am grateful

Friday, November 20, 2009

I'd like to lay my weary bones tonight, On a bed of California stars


Joe and I wrapped up the rest of the porch roofing yesterday under continuing balmy November clear skies. We decked the roof with alternating 1x6 and 1x1 runs of rough sawn material. We could have just made it easy and done the whole thing in 1x6. but that woulda been boring and I find it so compelling to take some more time to make it interesting when I see the opportunity.
What this means is, when you look up from the porch, you'll see a wide-narrow-wide-narrow pattern of planking that repeats left to right all the way up. You'll notice this pattern in the photos.

This afternoon not only did I make stars, I saw stars...

To make the porch detail even that much more fun, today I spent the afternoon cutting a star pattern into the roof. Our original plan was to have translucent roofing material which would allow light through the star cut-outs, but somewhere along the line we decided that it would look a little less attractive to have semi-clear corrugated plastic as the roofing material over this one portion of the house. The drawback is that when the finished roof goes on over these stars, light will not shine through, so they'll be less apparent. What I might do is paint the underside of the tar paper which we'll put down before the metal roof is installed. That way there will at least be some brightness on the surface at the top of the cut-out. We'll see these when we are in the kitchen doing dishes.

Half of the fun of this whole house project is the opportunity to make little details like this happen. It would pain me deeply not to be able to do this. You could go and paint some stars on the underside of your porch roof if you wanted -- and that would be fine, but how much cooler is it to have them built-in as a part of the building. Paint fades, cut-outs are there for the long haul.

The bit about seeing stars... I took a good bonk on the ol' cognator this afternoon that drew more blood than you'd guess and sort of put me out for an hour or two. I think I'm all better now, but it doesn't look that way to see the notch on my head.

Tuesday, November 17, 2009

Porch Roof part III - Assembly!


Today was fun.

To begin the day, we had almost all the parts that will be the roof over the porch cut and ready to go. On top of that we had the warm glow of the morning sun to take the November chill off.

When we were ready, we cleared the deck off, attached the little flat bases to each of the three posts and then stood them up.

Next came the beam that connects the posts. The beam sits in the pocket at the top of each post, and was installed in two parts with a lap joint over the center post, shown in the second photo.

After the beam came the rafters, and when they were all attached, we installed the lookouts at the two end rafters.

Once we had everything squared away with the post-beam-rafter assembly, we still had some time left in our day, but the sun had already set and the last glow was quickly fading. Having initially decided to call it a day, we rallied, pulled out the halogen lights, and put the trim on.

To finish off this little project we have the put the rough-sawn sheathing on, the last bit of trim and drip-edge and we're good. Oh yeah, we're going to peg some of the connections as well between the posts and beam.

Porch Roof Part II - Shaping the timbers


On Friday we made the rafters for the porch, and yesterday we shaped the posts, beam, lookouts, and post bases. This is a good deal of somewhat careful work because everything will be visible once the porch roof is assembled. There is a lot of detail as well, so there was a lot of time just making all the cuts and working out the arrangement of parts.

Above are some photos of us shaping the lumber. The next post will show the assembly.

Saturday, November 14, 2009

The Porch Roof


On Friday we began work on the porch roof. In designing the house I'd done some basic dimensioning to make sure everything would fit as it needs to, but beyond that figured we'd work out the details when we got to it. Well, now we are at it and Joe and I spent some time setting up a mock-up of the post and rafter to make sure we liked the height. I had drawn the posts at 8' and thats what we set up at first but it was immediately obvious that that would be too high. I chopped off about a foot on the post height and that seemed better. We screwed the parts into place and I had Nancy feel it out with me and we decided that what we'd set up felt about right.

On Monday we'll set about shaping the posts, beam and then setting up the rafters, which Joe cut Friday afternoon. Like the roof on the main house, there's a certain level of finish detail which will make this take a bit of time, but I think for the most part it'll fall together pretty easily.

Stack Framing


We are employing a technique of framing in building our house called stack framing, which is a little different than how your average home is built in terms of how everything is aligned. The reasons for doing this are: reduced material use, simpler and quicker construction, and improved insulation performance.

In a typical house wall, the studs are spaced 16" on center with a top and bottom plate (plates are the horizontal pieces of wood that connect studs at the top and bottom of a wall). Once the walls are built, a second plate goes on top of the wall to tie things altogether and then the next floor goes on top of that.

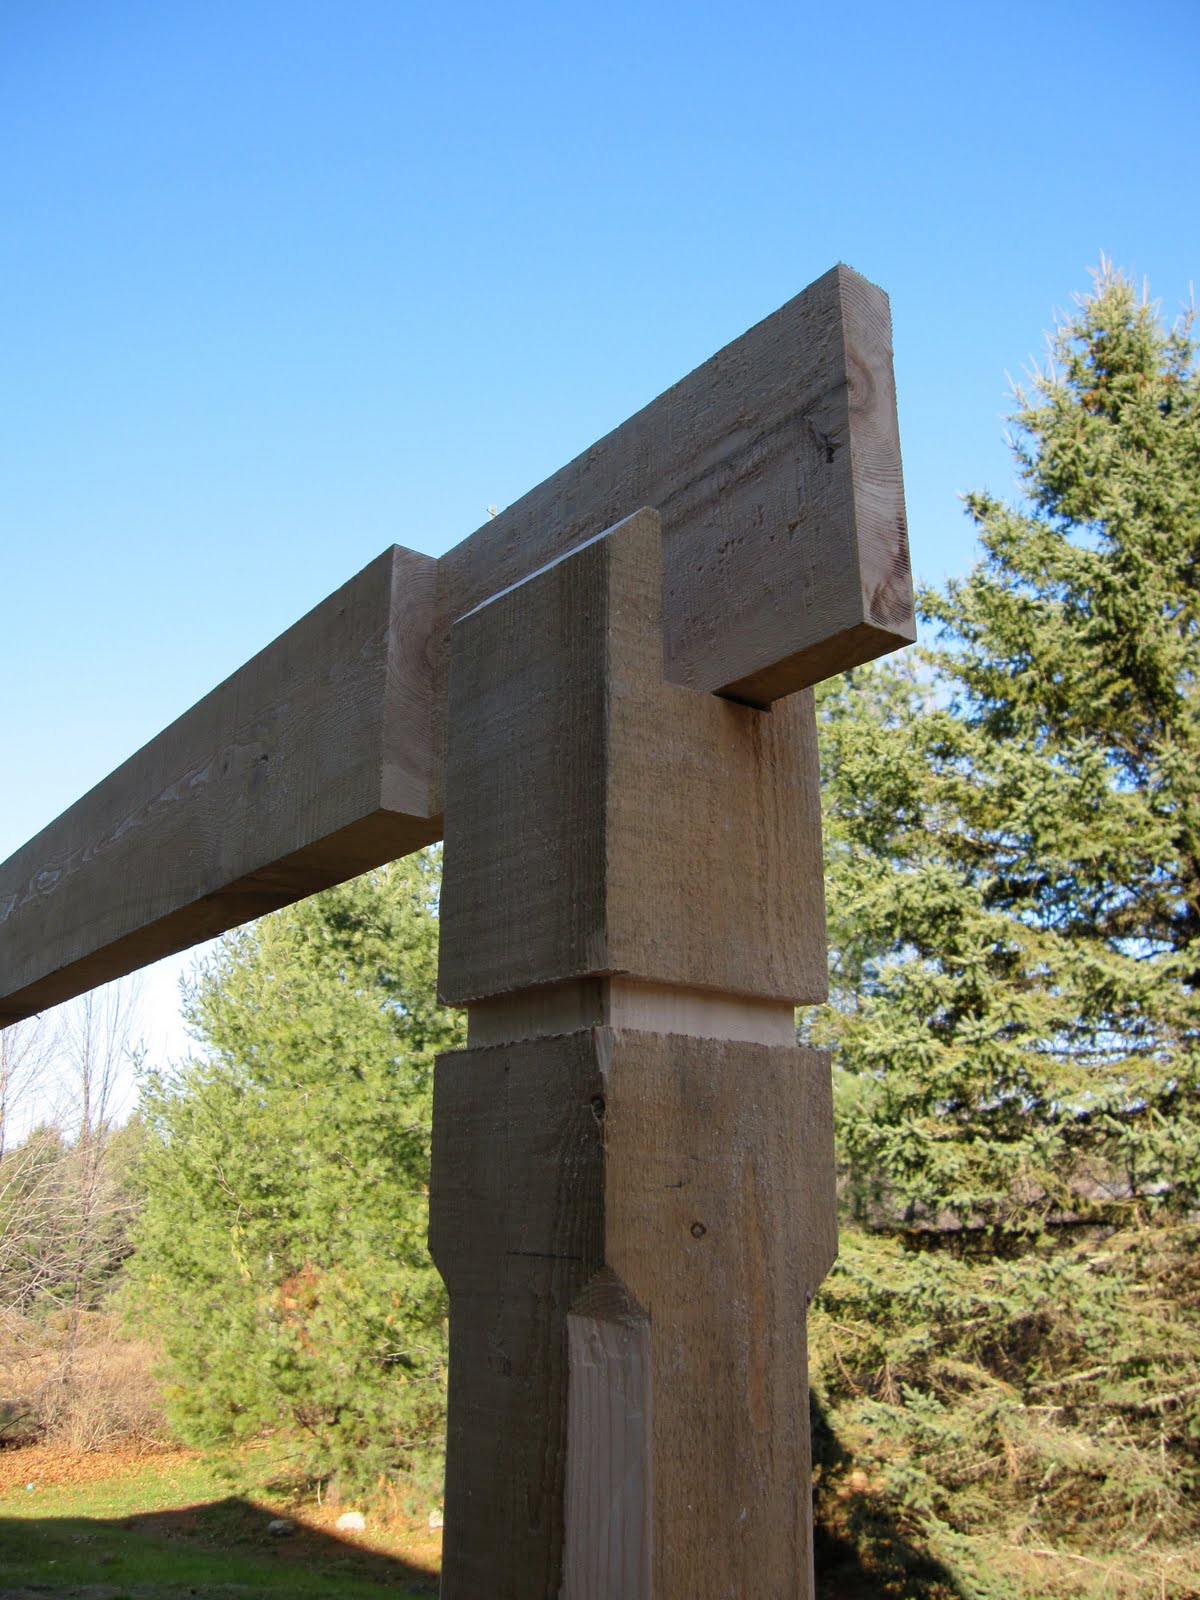
What we are doing differently is that our wall studs are spaced at 24" on center, and as we build each successive layer of the house going up, we make sure the framing is lined up with the framing below; we carefully align all the studs so that they are effectively stacked on top of each other going up through the building. The illustration above shows how the studs, the floor joists, and the roof rafters are all lined up in a vertical stack.

There are a number of benefits to doing this. The first is the reduction in lumber. Have framing members every 24" simply reduces the total quantity of lumber to build the house, saving some money. In addition to cost savings, this allows more room for insulation. It also lessens the number of thermal bridges from the outside to the inside of the wall envelope, i.e. less pathways for cold to reach into the wall via the wooden studs.

Think of this:
-In a 28' wall with studs every 16" on center, you'd have 22 studs. The studs are 1 1/2" wide, so if you pushed them all together they'd take up 2'-11" of space in your wall.
-In a 28' wall with studs every 24" on center you'd have 15 studs. Pushed together, they take up 1'-11 1/2".

By spacing our framing this way, we eliminate about a foot of lumber in our 28' wall that would otherwise be taking up valuable insulation space. These quantities really begin to add up when you think of all the walls and roof framing throughout the house. As I mentioned before, stack framing also allows us to eliminate a second top plate, again allowing for less lumber and more insulation.

Related to all this is modular layout. Modular layout means you design your building in dimensions that conform to standard building material sizes. An example would be something like making a wall 8' long rather then, say, 9'-2" because you can then use the full length of a piece of 4'x8' plywood. I made a point of using full 2' dimensions throughout our house plan, and there have be many instances where I noticed how it made our work easier, created less waste, or there is less cutting. This isn't to say that non-standard dimensions are a problem or bad in any way, but they create more work and waste.

The last element related to this is noted in the diagram above, which is leaving out window and door headers on non-load bearing walls. Headers are short beams that cross over any openings in the wall to receive and transfer load down and around the opening. If you think about the downward force of gravity pushing down on the roof, the pressure is transferred from the roof to the kneewalls and then down through the house to the foundation. The gable ends do not carry any of this pressure, so there is no need to put substantial headers over openings when they are located on gable-end walls. The photo below shows various window and door openings as we were building the first floor. The window opening at left is on a gable end wall, so there is no header above it, just a piece of lumber that frames out the top of the window. Moving to the right the two windows in the middle both are located in load bearing walls, so have headers over them. The door on the right is again in a gable end wall, so there is no header here either. This, like the other techniques mentioned above, saves on time in construction and materials located in the wall that would otherwise be insulation.
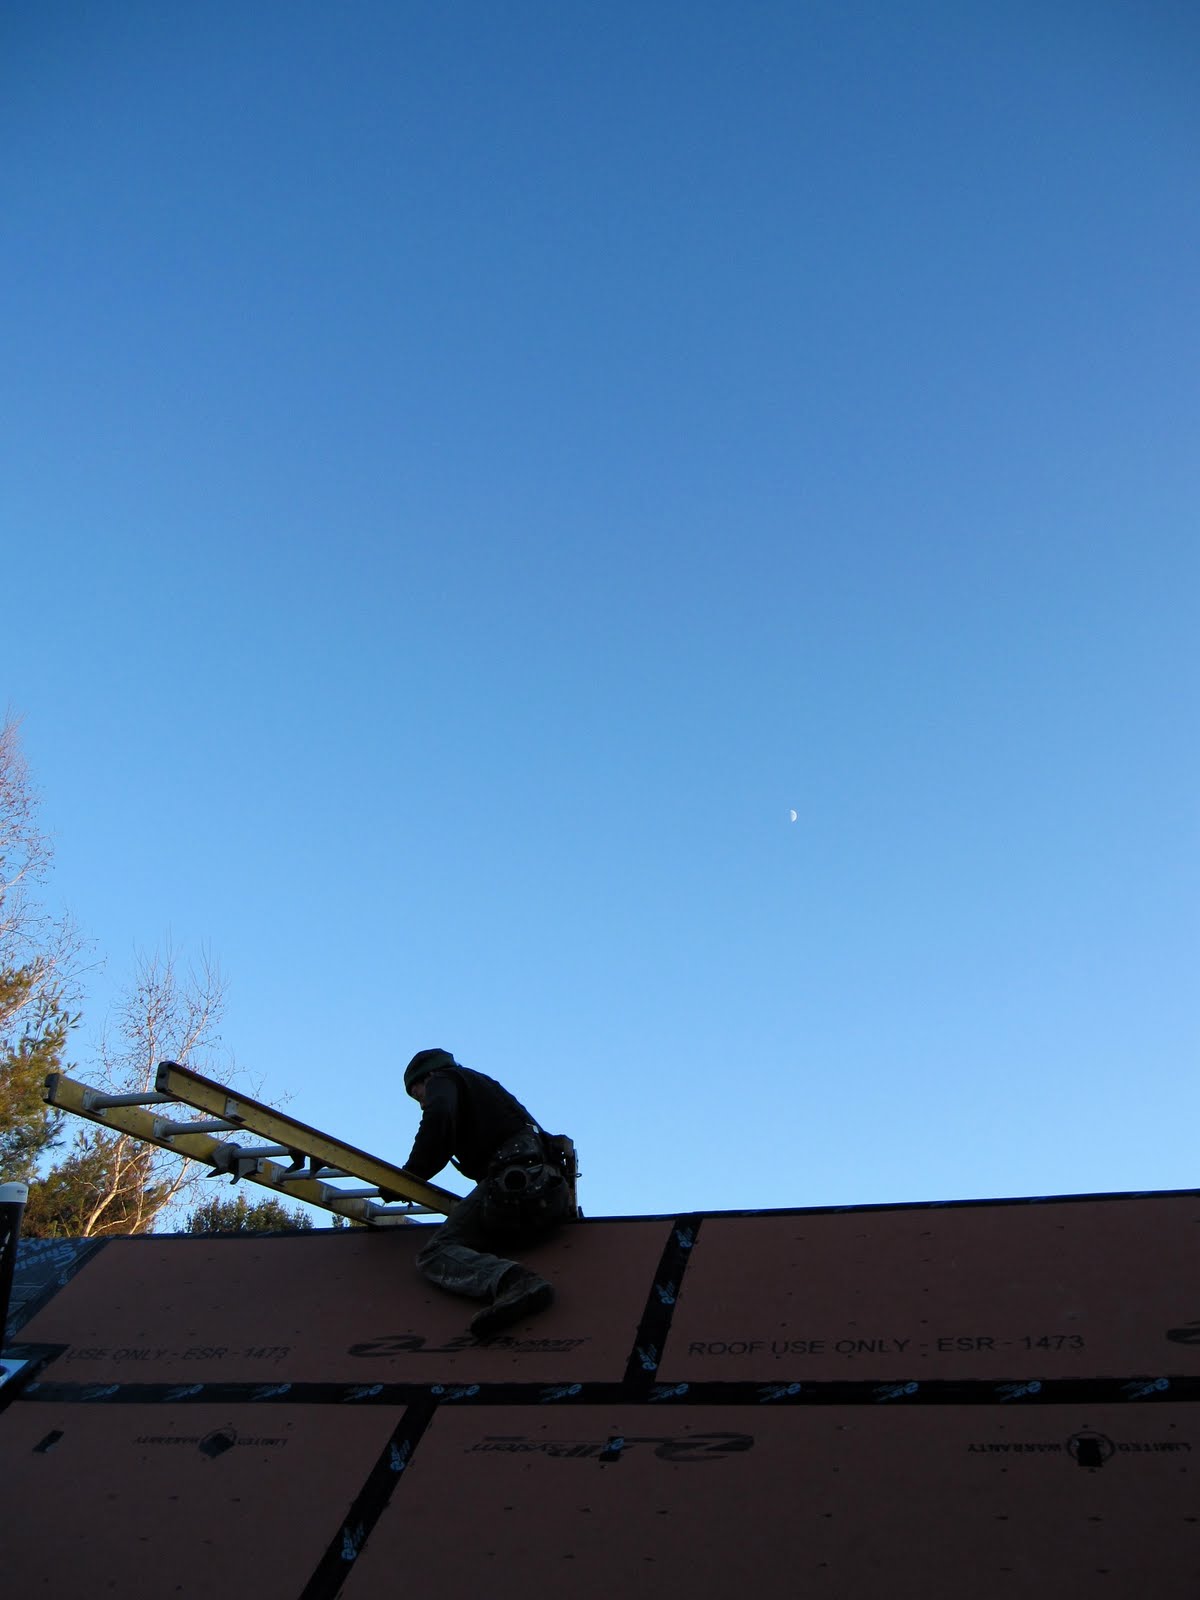