Showing posts with label Nancy. Show all posts

Saturday, November 24, 2012

Stair Railing, Pt. 2

I started off wanting to install a railing down the stairs from the second floor to the first, but was delayed slightly by needing to rebuild a section of upstairs railing before I could start to piece together the actual stair rail. With that now complete, I spent some time crafting the railing.

First off I needed to pencil  the height of the completed rail on the wall and then mount the handrail brakets that the railing will sit on when installed. We purchased some nice vintage reproduction brackets from Lee Valley.

One of the rail brackets. I find them really beautiful, but as is the lot of a rail bracket, it is mostly hidden from view behind the railing itself

With the brackets installed I then built up the rail pieces themselves. I had planned to continue the railing detail around the opening on the second floor down, but Nancy said it was way too big.  I then  sized the whole assembly down and it is much better now--easier to grasp and a gentler profile all around.

The junction of the two runs of rail where they meet at the landing


This is where the (newly extended) section of stair opening railing meets the rail that goes downstairs. I'm still not sure how these two are going to connect

The intersections where the railing sections meet are the challenging part since they are coming in at an angle and then making a turn or (in the case where the upstairs railing meets the stair rail) turning, dropping, and then turning again.  I knew the only way I'd be able to work this out was to build everything long and then make fitting decisions where I could actually see the relationships.

That is the next step: work out the connections between the two runs of rail and then sort out how I want to finish it where it enters out into the living room on the first floor. Should it be simple and unadorned and just end at the opening? End in a decorative curl atop a post? Hmm... I enjoy visualizing this kind of thing.

Wednesday, November 21, 2012

Stair Railing


Nice morning light coming in on the section of upstairs railing I'm rebuilding

Its become apparent to me that we need a railing for the stairway between the first and second floors. Any time kids or older folks are visiting I notice the subtle search for support as someone goes up or down the stairs. We are plannng to have a full house here at the end of the year with both young and old alike, so I'm working to get a railing in place beforehand.

This is a somewhat complex project for a couple of reasons. Railings often look simple because they seem to seamlessly wind down the stairway passage, but in fact there are sometimes odd drops and levels that require some creative woodworking and joinery.

The newly rebuilt section of railing that now extends about 6 or 7 inches further along the stair opening. The circle indicates where the post used to be


Additionally, joining the rail to the existing banister that runs along the stair opening on the second floor has required rebuilding a section of the upstairs banister. I resisted making this effort at first since it meant doing some careful deconstruction, but once I committed myself to going that direction it became clear that the project will be much more satisfactory in the end.

As you can see in the photo above, the original banister did not quite reach to the end of the stair opening, as indicated by the light colored circle where the post used to be. I considered various ways that I might extend the existing structure, but in the end decided that the best way to "stretch it" was to rebuild the whole section.  A really nice bonus to result from making this decision was the opportunity to do a better job positioning the vertical wooden posts that sit in groups of three along the span of the railing. When I built the section the first time I didn't really work out a satisfying positioning between the two metal posts and now I have the opportunity to correct that. You may not be able to see it too well in the photo below, but each grouping of three wooden posts now sit nicely centered in the run. It used to be off kilter and it bugged me.

New section of upstairs railing in place with newly positioned vertical posts


With the section of railing rebuilt and extended, now I can get on with my original goal to instal the railing down to the first floor.

Friday, March 9, 2012

The Desk

The new desk

The storage cabinet closed. Inside is the printer, modem and power strip

The inside of the storage cabinet

Note the arrangement for holding the various cables in place under the desktop. They are easily disengaged if need be.

Detail from one of the cabinet side panels

The office desk is nearly done. We are waiting on a little more hardware and there are a couple of tweaks here and there, but the big stuff is done and in place. I used cherry wood throughout.

You might recall from a previous post that Nancy and I came up with the design by creating a mock-up to test out the arrangement. From there I translated that into a plan for two cabinet bases, a large desk top and a "wing" that slots into the desk and provides good work space and views for Nance, who spends lots of time working at this desk. She's managed with some pretty rudimentary set-ups in the past, so its nice to create something that sets her up well.

The right hand cabinet is a conventional set of drawers; the top one is a simple drawer and the bottom one is a file cabinet sized arrangement.

The left hand cabinet looks like a matching cabinet with drawers but in fact serves as storage for the printer, the power strip, and the modem. The side of the cabinet opens to reveal the stuff inside but doesn't look like a door.

The wing is designed to easily come off so that we can have space to set up a bed in the office when we want to make it into a guest room.

When I was working out the plan, Nancy challenged me to come up with something clever for sides of the cabinets and I was sort of stumped. After tossing around some ideas I decided to stamp the side panels with letters and numbers--the idea being that desks, cabinets, printers and the like are pretty much about generating and holding letters and numbers. The result is subtle, but I'm pleased with how it came out.

A bonus is the keyboard drawer which I picked up the at the state of Vermont salvage store in Waterbury. It is versatile, easy to use, and very solid; a new version of this mechanism would cost over $100. It was a good catch at $10.

When the drawer slides arrive I will build a slide out base for the printer so it'll be easy to load up paper. The drawer pulls will be in that same order and installing those will round off this part of the project. Yet to come are an upper shelving unit along the back of the desk for storage and such. That'll be easy compared to the desk and cabinets.

Monday, January 30, 2012

Office Desk

Nancy at work. I was concerned the L would impede the passageway to the basement stairs, but its fine

The view outside is important and this arrangement works really well. Our bird feeder is outside the window on the right allowing for an easy glance over the computer

Sketches of the desk. We'll store the printer under the desk in a faux cabinet


We've been working on making the office space functional. For many months the computer has been set up on a little 3' x 3' table and we decided we needed to design a desk that would work well in the room.

This is Nancy's primary work space and she has a few priorities that we've been considering for a long time but never really figured out satisfactorily. Going way back to our original house plans we knew we didn't really know how we were going to make the space work, but we just figured we'd figure it out.

Nancy's priorities:
-View: In the yurt, she could glance just to her right and see the birds on the quince bush.
-Not having the desk run in front of the window(s)
-Proper storage and being able to spread out her work as needed

Beyond these requirements we want the room to still be useable as a secondary guest room when needed.

I spent some time playing with different arrangements and didn't really come up with anything satisfactory. As we looked at my sketches, Nancy suggested having the desk extend in an L out into the middle of the room. For me this seemed like putting a big hook in the way of the flow walking from the upstairs to the basement (something I do multiple times a day), but we decided to mock it up and to our satisfaction found that it met all our requirements. Nancy's been working on the mock-up since. Meanwhile I've been planing out the real thing and am just starting on building the desk now.

Our plan is for the wing of the desk that extends out into the room to be easily removeable. This will open up the floor space for a futon should we need to set up the room for sleeping.

Sunday, July 10, 2011

Cookin' in the Kitchen

Canning on the kitchen stove

Our scale

The end product

"Now I'll get to see if the kitchen works for canning."

So said Nancy as she began a long day of canning sour cherries and pickled zucchini. With our garden starting to produce, the annual canning and preserving ritual begins. This work is highly reliant on the stove and the kitchen work space. We managed in the yurt for years with a tiny little gas stove and a 3 1/2' wide counter, so clearly our new kitchen would be adequate, but would it all feel like it works well?

I'm glad to say after a few hours of sterilizing, boiling, warming and more boiling the verdict was yes, it works well. Our stove is obviously a good bit larger then our old one and the front-right burner is specifically a large-ring high-BTU unit intended for powerful output. When we are canning we are continually replenishing and reheating the large canning pot with water and it takes a lot of umph from the stove to keep it at a boil. Often in the past we'd be waiting some portion of the time just for the canning pot to get up to a boil again.

Spurdles

A collection of spurdles and rye

We have a small collection of spurdles that are now hanging in our kitchen. Some of the rye that we planted in the yard has formed its tassels and I was inspired to put them together.

What's a spurdle you ask? Why its a Scottish stirring stick of course! I believe they are typically used for porridge, but we use them for lots of things. Nancy got a bit of a spurdle collecting bug and now we've received a few different ones. The one second from the left was hand turned by our neighbor John Riley.

Sunday, June 26, 2011

House Warming


Look closely at Teri's card...


Yesterday a pile of folks showed up to visit, have a little food and look around. It was a great afternoon and the weather cleared up with a little time to do some mowing and arranging outside. It was a wonderful celebration.

Many friends and family were here. In particular it was great to have Joe and Adam back to celebrate what we all helped create. I wish we could finish building our house more often so we could have an excuse to gather together our friends and neighbors like this more frequently.

Our friends Jeanne and Craig thoughtfully offered a blessing of salt, wine, and bread inspired from a scene in "Its a Wonderful Life":
Bread- that this house may never know hunger
Salt - that life may always have flavor
Wine - that joy and prosperity may reign forever

Among the treats and great food, Nancy tried out a recent discovery called switchel, which used to be served a refreshing drink on farms in the days before gatorade-type drinks. Its super yummy and I'm hooked...

Sunday, April 24, 2011

Artwork

A framed Bread & Puppet poster outside the first floor bath

A oil-pastel of the yurt hanging in the stairway positioned essentially where the window view corresponds to the view in the image.
A close up of the yurt oil-pastel

The vanity in progress

We've started hanging bits of artwork here and there.

It is (for me at least) a somewhat cautious process of pulling things out and thinking about what might go well in any given spot. Its not like we've got a massive trove of great artwork, but we've got a few things and its fun to contemplate putting them up. I find when we do, it adds a sense of completion to an area or a place that is very satisfying.

I was a Fine Arts major in college and did a bunch of painting over the years. I've also done woodblock prints as well and it'll be fun to dig into some long-packed away work and see if there is anything that merits hanging on our walls. In actuality, I've given a lot of my best pieces to other people as gifts, so I doubt there is too much that I'd really feel that enthusiastic about hanging up.

Nancy was a Peace Corp volunteer in Papua New Guinea in the late eighties and acquired a number of really cool figures, masks, spears and other local craft that is also really fun to think about finding a home for in the house.

Unrelated to any of this I've been busy building a vanity in the second floor bathroom that will be housed behind the hanging mirror that we've had in place for the last couple of months. I want it to work so that the mirror still hangs off the wall at the slight downward angle that it does when it hangs from a nail. That is making the execution a little more complicated, but I think it'll work out pretty good once its all together.

Tuesday, April 19, 2011

A tale of two bulbs

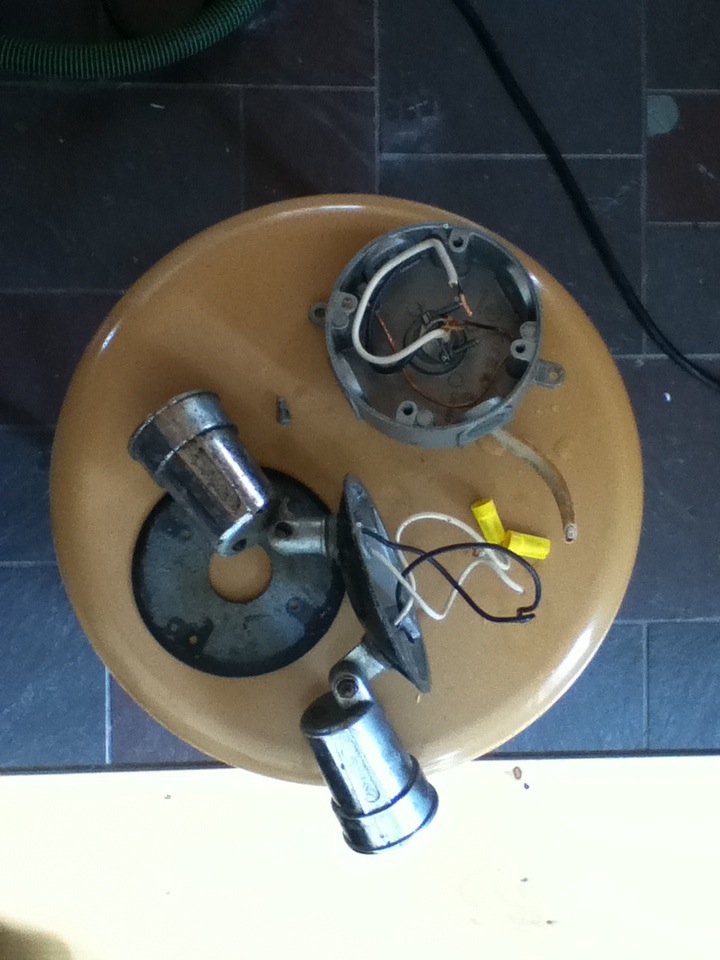
A standard "Edison-base" lamp mount on the left and a "pin-base" lamp holder on the right.

Today we had our final visit from Efficiency Vermont which is the organization that encourages, measures, and rewards efforts towards energy efficiency in Vermont businesses and homes. Although we were attentive to meeting the required standards put forth to qualify for Energy Star rating and meet the requirements for the various incentives, I must admit I didn't actually hone in on what we needed to do to meet these points until fairly late in the game, basically confident in the knowledge that the standards to which we were building would far and away exceed their minimums.

Lighting was the one area that I struggled a bit with. In order to meet the standards set for our home we needed to have a minimum of 10 pin-based light fixtures in main living areas. "Pin-based" means what it implies, and ensures that the only lights that will work in it are florescent bulbs, guaranteeing reduced electrical consumption because you can't just throw in an incandescent bulb if you feel like it.

Early on Nancy and I went to a couple of lighting stores with "pin-based" fixtures in mind to look at the selection and were quite underwhelmed. I would say that maybe 1 or 2 percent of the available fixtures were of this type, usually housed in some neglected back alcove. As long time readers will recall, soon after this experience I became fixated on building my own light fixtures and discovered that I could build almost any light fixture with a pin-base, and so many of the lamps throughout the house now feature this type of lamp base.

Additionally, we purchased some LED recessed down-lights for the living room and a series of mini-florescent bulb-fixture combinations that are mounted in the track over our counters in the kitchen.

In advance of the visit from Efficiency Vermont I knew we were in pretty good shape, but I was a little uncertain if groups of lights would count as "a light" or as individual units, so I made sure we had the required minimum, even by conservative measures.

In the end we passed the needed minimums just fine. The irony is that we would be using mostly florescents even if we weren't incentivized to do so and the light bulbs that fit pin-based lamps are actually more expensive than the Edison-based florescents that you frequently see for sale.

The expectation is that in a few years the pin-based requirement will be outdated because you will not be able to buy incandescents any longer, so there will be no need to require a special mounting base. I suspect that as the pin-based bulbs die out I will rebuild the fixtures so that we only need to have one type of bulb on hand.

You might be interested to know that we expect to receive somewhere in the neighborhood of $3000 in various incentives, rebates, and rewards for meeting the required guidelines. We will also be given what is known as a HERS rating, which stands for Home Energy Rating System and is a standardized number that allows comparison with other buildings and buildings in other regions. More about this later.

Tuesday, April 12, 2011

Photo Shoot


above photos: Teri Maher


Today was our big publicity day, such as it is. Our friend Teri came over to take some pictures of the house with the paint colors in place that she consulted with us about way back last fall. When she first came over there wasn't much for her to work with: unpainted sheetrock and only the vaguest of ideas of what we wanted on our part.

With the house fully painted and mostly complete, visitors often remark on the great colors and we have Teri to thank for this. We knew we wanted to be adventurous, but it was her that got us there.

Teri spent the afternoon here today taking pictures for her website and other publicity as she establishes her interior design company. I helped her by supplying furniture and various objet d'art that I thought might be useful. She has a great sense for this kind of thing and Nancy and I kept going "cool" at the various set ups she created.

Teri has a website which is just getting off the ground and can be found here.

Saturday, March 5, 2011

Lights and a Cape Cod Sink

New-old sink in the first floor bath

Another view

Building a lamp fixture

A light hanging over the dining room table from track. We have a vision of a series of small lights hanging here at different heights

Disassembled exterior fixture about to be painted black. This was mounted on the the old garage and will now serve as the fixture that lights the walk route into the house

I've been working on installing track where we'll have track lighting in the kitchen and dining area. This required a little sheetrock work again; cutting strategic points to wire or re-wire to make what we need to have happen. In the case of the kitchen track lighting we decided to make the track tw0-circuit so that we could have some or all of the lights on depending on which circuit they are fixed in. This allows, say, the light over the sink to be on it's own circuit and switch from the rest of the lights that light the counters. I'm always a little hesitant to cut into the sheetrock, but usually it goes pretty smoothly and I'm mudding it back up in short order.

I've built up a couple of lamps and they look just fine. One is hanging over the kitchen table, the other is over the kitchen sink. More to come.

Remember that big old sink we had in the downstairs bathroom? Well, it has moved down closer to it's final home in the basement. In it's place we've finally installed the sink that Nancy's parents Lee and Lou brought to us last fall. It's a great old marble sink that used to be in the bathroom at their house on the Cape. Its kinda battered and stained, but it's got a good measure of beausage (pronounced like "sausage", as in beauty-through-useage) and looks quite handsome in out bathroom. We're planning on replacing the faucet controls because they are kinda beat up and sorta unattractive. Eventually we'll build a cabinet that the will replace the brackets that the marble sits on right now.

One more piece of the puzzle in place.

Tuesday, March 1, 2011

Looking Back to When It All Began


Nancy here, who has been itching (just like Dave keeps scratching in this video) to submit this post!

We went to town meeting this morning. This is always a social occasion and several times we were able to respond positively and without any equivocation on our part to the question "are you in the house yet?" Funny how different a simple "yes" sounds as we've gotten so used to following it up with the qualifiers. As in "we are sleeping in the house, but everything else is still in the yurt" or my favorite, "but the kitchen isn't in yet!"

In celebration of this major milestone, we'd like to share a little clip from day one of construction. Now that we're living in the "after" here's a look back at the "before".

Although the house has been a team effort and we've had lots of help along the way from many friends and contractors, now is a good time for me to publicly recognize all of Dave's love and labor that has gone into these walls. I am very proud of all that you have accomplished Dave. With great humor, hard work, and a vision, we have a beautiful new home. Well done!

Much love,

Nancy

Monday, February 14, 2011

Signs of domesticity


I completed the countertops today and that pretty much finishes off the kitchen for the time being. Phew! In a matter of hours Nancy and I were slicing up hors d'oeuvres and making diner in our fancy new kitchen. It feels so good. After dinner I loaded the dishwasher and cleaned up while Nance made a little fire in the woodstove and we shared a little Valentine's Day treat for dessert while we got all sleepy from the fire. We are feeling a lot of gratitude for such a comfortable home.

I'll be working on the stair railing tomorrow.


Saturday, February 5, 2011

Saturday stuff

I was the recipient of an iTouch for Christmas and today I downloaded a free paint app. This is what I came up with

The counter top complete. Next up sanding and final shaping for installation

Messing around with railing ideas

Some of the cabinet doors Nancy is working on

Today was sort of a half-hearted effort on my part as I was sleepy and in need of a nap so I didn't get too much done. Nancy on the other hand has been powering through finish work on the cabinet doors, drawer fronts and cabinet frames. It's all looking really nice. Particularly with stuff like the doors its a lot of work to sand between each coat, but she's making good headway and should have it all ready to go in couple more days.

I completed the counter tops last night and today started in on sanding them down to smooth. Its not so hard as it is a matter of patience just sanding sanding sanding. They're gonna look good when they are done.

Saturday, January 29, 2011

This weeks' work

One lamp refinished, one waiting for some work

Nancy getting ready to apply the oil finish to the cabinet doors and drawer fronts

The step that Adam built down to the guest room on the second floor

Adam putting in the plugs on the stair tread screw holes


We rounded off this week with more along the same lines as recent work. Adam got the majority of the stairs in and all the screw holes plugged (there are two stairs left to go that require some special shaping before installing, so that'll happen next week). Nancy began work on finishing the cabinets, which is a multi-stage process over many days (we are copying our friend Kate's recipe for cabinet finish which starts with an oil finish and the multiple coats of polyurethane). I did a small rewiring project to make a the switches in the guest room make a little more ergonomic sence, and Felton was here to wire up our stove/oven in the kitchen.

I spent this evening cleaning the oxidization and accumulated stuff off of one of a pair of lights that we plan to mount outside the west end garden doorway. I just happened to come across these lights a couple of months ago in a free pile outside someone's place on the chance we might want to use them. They strike me as a little formal, but they are nice lights so we are going to put them up and see what we think.