Showing posts with label first floor. Show all posts

Monday, March 14, 2011

Loose ends

The toilet paper holder in the upstairs bathroom. The top part is a shelf and the bottom holds about 6 rolls of tp down in the wall cavity

When we installed the sink the spacing of the lights overhead was off (originally based on the assumption of a longer sink) so I had to re-locate the wiring and then patch up the wall

The appraiser for the bank is coming on Thursday and I am tying up the various loose ends that would make the house appear unfinished, such as the t.p. cubbies in the bathroom, the shelf over the closet on the first floor--things that aren't that big to do, but are nonetheless incomplete. The last thing is lights and I put in a big order for lighting parts last week. I'm hoping they'll get here in time that I'll have the lights looking done, even if they're not quite. There are also multiple touch-up spots where we've cut into the sheetrock or done something that now requires a touch up.

Provided I get the stuff I need, I'll be whipping together a bunch of lights before Thursday AM.

Thursday, February 24, 2011

Dying Camera

This is the detail overhead when you come down the stairs to the first floor

A slightly better photo of the new shelves in the kitchen

I managed to coax the lens out on our dying camera today to take some semi-okay quality photos. At least they are better then the grainy photos the iPod takes when the light is low.

I finished a little playful detail over the stair of steam-bent maple that forms sort of a swoop from the second floor down to the first. Quality-wise it is a little rough, but I like the effect. I may re-do it sometime.

Besides that I got a bunch of the last pieces of trim poly-ed and I'll be throwing some quills in those tomorrow and that'll be that for trim.

Wednesday, December 22, 2010

Slate and Tile

Detail of the tile pattern in the shower


Our kitchen floor slate pattern. We were surprised, but not unhappy, at the color variety that falls under the "purple" designation. The little white things are spacers.

My main mission today was laying the hardi-backer, which is the cement board underlayment placed on the floor before the slate floor goes down. Luckily, Jake was here working on the downstairs shower and so was able to guide me as I mixed the mortar and tried my hand at a process I'd never done before. It went just fine and worked out nicely.

Meanwhile Jake was installing the tiling in the shower and did nice work. We changed our tile design after it became apparent that my original concept required tile sizes that were not available. Last night Nancy and I calculated the quantity of tile we had to work with and came up with a new horizontal-band concept that used the available tile well. Jake went to it and at the end of the day had two of the three walls complete. We're quite happy with the result.

Tomorrow Nancy and I are all set to install the slate in the kitchen. I laid out a box worth of the pattern and was both surprised and pleased at the color variation in the "purple" slate that we purchased. In reality there is a mix of gray and purple slates with some very interesting green spots among the purple. Nance commented that we had struggled over what color to go with and in the end kind of wound up with a little of both our choices.

We're both excited to put down this floor tomorrow.

Thursday, November 18, 2010

Beam Me UP!


Today we installed the 23' long steel beam under the first floor floor joists and it went smoothly. This included cutting a small rectangle in the floor to allow the post of our hand-cranked lift to be fully extended to then lift the beam all the way up snug against the joists.

Once we'd lifted the beam up under the floor we installed three adjustable posts. When it was all done the first floor felt quite solid and we eliminated a slight depression in that area. It was an involved project but well worth the effort.

Monday, March 22, 2010

Closing in on the electrical

The electrical punch list

Some wires in place

A triple switch box in the kitchen

This is where the bed will be. You can see the matching outlets and light switch boxes to the left and the right with the blue light mounting box above in the center


Last Friday Felton came up to the house and did a walk-through with me to go over the progress on the electrical work. It was useful and as we talked I made a list of things I needed to change, correct, or complete. With the list in hand, I want to work through this stuff and be as done as I can be with the electrical work. I hope that I'll be there in another day or two, although it seems to go slower then it seems like it should.

Before moving on I'm going to go around and label everything so we know what is what and what is going where for what purpose. I've been labeling along the way, but not thoroughly, so I want to make sure we can understand everything once the sheetrock is covering the wires snaking through the walls.

The challenge is to anticipate and wire for intuitive light switching as you move through the house. I drew this all out in plan but have found myself mostly just doing it from feel in the actual house. Today I ran a circuit that allows us to turn on a light centrally located on the first floor from either entrance doorway or at the bottom of the stairs. A similar issue has been working out lighting for coming up the stair and going to bed. We've decided that we'll have a light over the bed that can be switched from either side of the bed and at the top of the stairs as you come up. The last photo shows the boxes in place for this as well as the blue light mounting box affixed to the rafter centered above.

I'm ready to get done with the electrical work and move on to completing the plumbing.

Thursday, February 11, 2010

Running the wire

Felton, pointing me in the right direction

Where the load center (circuit breaker box) will be located in the basement

Some wiring in place

The to-do list

After a look around and coming up with "what's next" yesterday with my stepfather Felton, who is a licenced electrician, I started off on the electrical work today. I ran the wiring from the kitchen receptacles and appliances down to the "load center"--formerly known as the circuit breaker box. Its pretty basic, but this is the easy stuff. Its the actual wiring the switches, outlets and fixtures that comes later that baffles me.

I worked my way around most of the first floor today and will finish it off tomorrow. That leaves the second floor for early next week. Today I also boiled down the plans for the stairs to the basement.

Since I'm somewhat dependent on the help and timing of others, I made a list of things that I'll do while keeping the plumbing and electric rolling. There's plenty to do, but it helps to have it laid out in a list in front of me.

Monday, February 1, 2010

Interior walls

The first floor interior walls show (from l. to r.) the bathroom, the closet, and the mudroom. There is a door from the mudroom that will allow access into the closet. The stairs to the second floor will eventually be located to the left of the bathroom.

This photo shows the closet. There will be a built-in shelving unit that will fill the space opening towards the camera. We currently have a shelf of similar dimensions in the yurt and it works well for us.

This is the upstairs bathroom. The end wall with the door was not yet completed when I took the photo.

Last week was a short work week because we went to Boston on Thursday. Mostly I worked on building the interior walls on the first and second floors. It went pretty smoothly.

I was apprehensive that building in the walls would somehow diminish the experience of the first floor; that it would suddenly feel small and cramped and chopped up, but to my relief it actually still feels spacious and open.

Having these walls in place allows me to start laying out the electrical boxes; the switches, the outlets and the mounted lights, which is what I started working on today.

Tuesday, January 19, 2010

First Floor Panorama


I spent yesterday clearing out all unneeded equipment and materials. Today I took care of some errands, including a trip to the dump and dropping off some tools in need of repair. I also picked up some mylar drafting sheets in order to start drawing some interior elevations to clarify our choices for that come into play with with our lighting and electrical work.

In a sense it feels like we are at a new starting point. When we first designed the house, we made enough decisions to get us to "go" but left a lot of the finer details to be worked out. Now we have to make those decisions. Its exciting stuff.

The photos show a panorama of the first floor.

Saturday, September 5, 2009

The Week in Review

The last few days have been all about continuing building the first floor walls. We've honed the process down to a routine and they happen pretty quickly. The walls weigh a lot by the time they are ready to go up; thanks to Joe's wall jacks the two of us are able to winch the walls up with only a rhythmic work song and some even cranking. Because the plywood runs past the end of the framing to cover the end of the previous wall, we need to build each successive wall out about a foot laterally from its final placement. This means we have to move the wall along the edge of the floor deck to get it in place.

To achieve this we are using some 1" wooden dowels that we place periodically under the wall with the assistance of a hefty crow bar. The elevated wall gets the pressure off the rubber sill gasket and allows us to roll the wall into place.


Sunday, August 30, 2009

The Week in Review


Its a little amazing to see what changes in just a few days. I look at the last post and think "Wow, we've made some progress". A few key steps:

-Toward the latter part of last week the Presby septic system was completed and then covered with sand and a layer of topsoil. The septic system then connects back to the house via a distribution box (actually a cylinder) and a large septic tank --visible in the first photo being placed in the ground-- just off the east end of the house. Once these pieces were in place the site crew were able to shape and grade the entire area around the house. It now feels like a barren but gentle landscape.

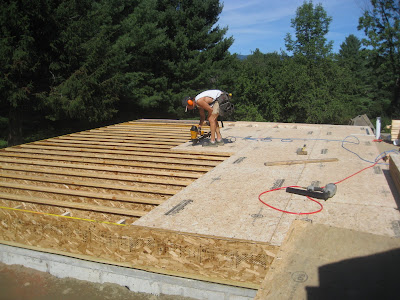
-Joe and I completed the sheathing of the first floor and then built two walls. We are waiting on the exterior siding material which will apply while the walls are still on the floor. We will then stand them up and move on to the next ones. An important aspect of this project is working to minimize the lumber used in the framing of the house. The less unnecessary lumber, the more room for insulation. In practice this means the wall are framed at 24" on center, rather then the more common 16". In hand with this is building so as to stack framing members one over another. This means that a stud in the wall on the first floor will have a joist directly above it and then the stud on the second floor directly above that.

-We had a big rainfall throughout Saturday that continued all day. Besides making things a little mucky around the house, it settled some of the newly shaped earth, which in turn allows us to see where the grading needs to be tweaked so that water is moving where it should be away from the house.

-We met with the Thermotec window representative and nailed down our order. Finally. Phew. A couple of minor adjustments go out tomorrow morning, but other then that, we've made our decisions.

I'm finding it a little harder to take photographs that encompass the whole house from above as I've been doing up til now because the house is quickly rising up towards the sky, while my vantage point from the peak of the nearby garage is stationary and able to encompass less and less in the view. The last two photos above show the first floor deck in two parts. Maybe I'll figure out the photo stitch feature on our camera soon so I can do some wide angle views.

Saturday, August 22, 2009

The First Floor


The first floor deck flew up quickly, and but for a bit of rain and me catching up on structural questions, we might have actually had it all sheathed yesterday. No worries, as I'm happy with how things are moving along, and if anything it feels like the project is moving faster then I would've guessed and I need to mentally re-adjust to the requirements of being both builder and planner.

Here's a few photos from the last few days.