Monday, August 31, 2009

One Wall to Rule Them All

This is the framing plan that shows what pieces go where, and what size.

Here's the wall being framed. If you look you can see the arrangement of studs that match the drawing in the photo above.

Here's the wall with the zip system sheathing installed and the seams taped (the black lines).

Joe is attaching furring strips every 1 foot on center. This gives the exterior a sort of pinstripe look.

This is the wall standing up. Its effortless with the wall jacks.

Today Joe and I spent a lot of the day working out our wall building system sequence and procedure. Typically, building a wall is pretty straightforward; you lay out the framing, square it up, sheath it in plywood and stand it up.

Our process is similar, but we are using a sheathing called Zip system and the primary thing about it that it has the vapor barrier built into it. Most folks have seen houses being built that at some point are wrapped in Tyvec or Typar or some other similar product. We don't need to do this because the wrap is already a part of the plywood. All we need to do is tape the joints between the plywood and its good to go.

After framing the wall, we attach the rubber sill gasket to the bottom of the wall, attach the wall it's self to the floor with some thin metal strap to keep it from sliding when we go to lift it, caulk our perimeter openings against air infiltration, and then sheath the wall with the Zip system plywood.

After the sheathing and taping happens, we strap the wall with 1/2" furring strips running vertically every 12" on center to create a rainscreen, which is an air space behind the clapboard siding that will be installed in a few weeks. The strips allow air circulation which keeps moisture from gathering behind the clapboards, which in turn lets the painted surface remain intact while the boards stay dry and last longer. Before attaching the strips, we need to layout where all the trim will go in order to know where attachement points are needed.

Once the furring strips are in place, we are ready to raise the wall into
place. Thanks to Joe's thoughtfulness, we are equiped with wall jacks which make raising the walls a matter of cranking a couple of wiches. The wall jacks are essentially masts that have a steel cable runing up and over them with a hook on one end and the winch on the other.

It took us a while to get ourselves to the standing wall, but that's okay because we were basically doing a test run for the rest of the walls, which we'll be continuing on throughout the week.

Sunday, August 30, 2009

The Week in Review


Its a little amazing to see what changes in just a few days. I look at the last post and think "Wow, we've made some progress". A few key steps:

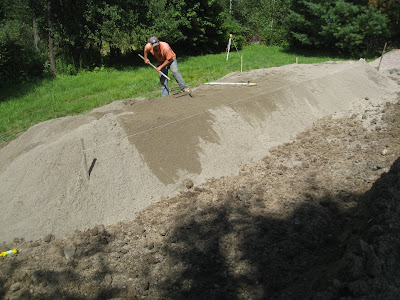
-Toward the latter part of last week the Presby septic system was completed and then covered with sand and a layer of topsoil. The septic system then connects back to the house via a distribution box (actually a cylinder) and a large septic tank --visible in the first photo being placed in the ground-- just off the east end of the house. Once these pieces were in place the site crew were able to shape and grade the entire area around the house. It now feels like a barren but gentle landscape.

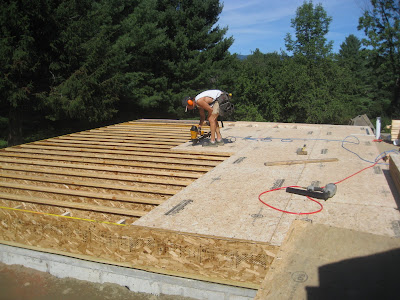
-Joe and I completed the sheathing of the first floor and then built two walls. We are waiting on the exterior siding material which will apply while the walls are still on the floor. We will then stand them up and move on to the next ones. An important aspect of this project is working to minimize the lumber used in the framing of the house. The less unnecessary lumber, the more room for insulation. In practice this means the wall are framed at 24" on center, rather then the more common 16". In hand with this is building so as to stack framing members one over another. This means that a stud in the wall on the first floor will have a joist directly above it and then the stud on the second floor directly above that.

-We had a big rainfall throughout Saturday that continued all day. Besides making things a little mucky around the house, it settled some of the newly shaped earth, which in turn allows us to see where the grading needs to be tweaked so that water is moving where it should be away from the house.

-We met with the Thermotec window representative and nailed down our order. Finally. Phew. A couple of minor adjustments go out tomorrow morning, but other then that, we've made our decisions.

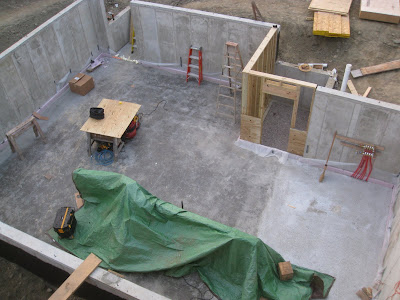
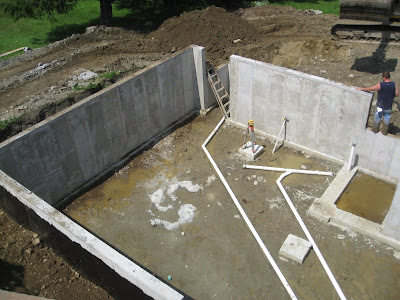
I'm finding it a little harder to take photographs that encompass the whole house from above as I've been doing up til now because the house is quickly rising up towards the sky, while my vantage point from the peak of the nearby garage is stationary and able to encompass less and less in the view. The last two photos above show the first floor deck in two parts. Maybe I'll figure out the photo stitch feature on our camera soon so I can do some wide angle views.

Tuesday, August 25, 2009

More site work


Joe and I wrapped up the root cellar yesterday, moved the remaining lumber onto the completed portion of the deck last night, and the excavation crew was back this morning. They're here to back fill the foundation, cover the root cellar, and install the Presby septic mound system. Today went really well; Joe headed up the road to help our neighbor Aaron out and I spent the day clarifying my next big lumber order and getting it out. I also did a bit of catch-up with connecting an interior drain to the outside perimeter drains that I forgot to connect before the initial back fill went in.

The Presby septic system requires literally truck loads of a specific sand that has to come over the App gap from Hinesburg. It forms the bed for the pipes which will lay on top and then be covered with more sand. This all will be connected to septic tank that will sit just outside the foundation.

Paint Color Test

We've been working on the exterior color scheme for a while now, noting places that we like, looking in books, soliciting advice and anything else to help us get closer to "it".

A couple of houses have inspired us. The first photo shows a schoolhouse in Woods Hole, MA that is being renovated. We stopped by and talked with the painter and were able to get paint color numbers and all. The scheme is basically a grey body, cream trim, and cottage red window frames. In fact, the different walls of the building have been painted and matched a few times, so there are different tints in different areas. The one wall we liked in particular had a ever-so-slight green tint to it, which is the wall on the right with the three large window openings.
This photo shows a house in Moretown, VT that also caught our eye. The scheme: light green body, ever so slightly creamy-green trim, and black frames. Its a striking combination, but we thought we'd try a combination of the two: cottage red frames with the green wall and cream trim.
In order to do this, I mocked up some clapboard siding on the end of the breezeway over our water catchment system; green, cream, red on the left and green, cream, black on the right.
The next two photos are an attempt at showing the colors isolated from the surrounds, but the sunlight was casting shadows making it a little hard. I might try again when the light is neutral. If you, dear reader, have a strong argument one way or the other, speak up soon. We meet with the window guy tomorrow and that'll be when we nail it down for good.


Saturday, August 22, 2009

The First Floor


The first floor deck flew up quickly, and but for a bit of rain and me catching up on structural questions, we might have actually had it all sheathed yesterday. No worries, as I'm happy with how things are moving along, and if anything it feels like the project is moving faster then I would've guessed and I need to mentally re-adjust to the requirements of being both builder and planner.

Here's a few photos from the last few days.


Tuesday, August 18, 2009

Monday, August 17, 2009

Going at it


Today Joe and I started actual work on the house, specifically the root cellar walls which complete the structure of the basement. After months of rainy cool weather we are finally being graced with muggy humid weather in the upper 80's. Its a beast, but it feels great, like summer. We took a much needed swim in the Mad River at lunch and then again when we were done in the early evening.

Any new project takes a little while to get into a groove, and given that, we were able to get set up and rolling pretty well. By the end of the day we had both of the root cellar walls in place. Tomorrow we'll tidy up the walls and build the roof over the root cellar, which will allow for us to move onto the sill and work on the first floor deck. Completing the root cellar will also prepare us for the earthwork and grading which will happen next week.


Thursday, August 13, 2009

Look-alike

Nancy and I went to a wedding over in the Champlain Valley last weekend. While we passed through Lincoln, I noticed this place:
It caught my eye for a number of reasons: the window style, the proportions, and the way the eaves are finished. This house is essentially what we are building although the perspective on the photo distorts the similarity.

Here is the east elevation of our place. There's been a few changes since this was drawn, such as a light above the door, but this is pretty much what the house will look like.


Nancy says I've never seen a crumbling old place I didn't think there was "something really cool about". It's true. I find myself drawn to places that evoke their age and the age that they were built. I guess I also see the potential for what a place could be. There is also this sense that all pretension has left and what remains is the essential building.

Tuesday, August 11, 2009

Pex, and a pressure test


The various loops of pex tubing all return to a central location where they are then fed into a manifold. The manifold is an impressive cast brass unit that mounts on the wall. What happens after the manifold is something I'll be able to report on once I get there. For now, it all just hangs out.

After hooking up the pex loops in sequence, I then attached a small valve and pressure dial. This allows me to pressurize the tubing system to check for leaks before the concrete is poured when the pex will no longer be accessible. The fitting on the valve receives a bike pump air connection, so, in honor of all things bicycle I decided it was only fitting to pump up the system by bike pump. Roughly 480 strokes later (whew!) the system was up to the required 60 psi. Seeing as it was dark and late and it all looked good, I went to bed and made a note to come back and check it in the morning.

Lo and behold this morning I checked it and it was down to maybe 5 pounds of pressure. Darn. Knowing that the most likely candidate was a leaky connection on the manifold, so I got some soapy water and daubed the various connections and sure enough found a leak. I recconected that fitting and the system has held steady at 60 psi since this morning. I must admit, I used an air compressor to fill the system the second time around.

Thursday, August 6, 2009

Insulation and radiant tubing


Today was Joe's first day on the job and it went great. We were getting ready for the concrete slab being poured sometime in the next few days. We had to build a retaining perimeter around the root cellar area and a thermal break at the doorway up to the bulkhead. We also laid down the plastic sheeting, then installed 2" rigid insulation. Once that was done we installed the pex tubing, by which we'll have radiant heat eventually running through the slab. It all went really well, but took way longer then I would have imagined. Hats off to Joe for sticking it out on a long day!

Wednesday, August 5, 2009

The foundation and beyond...


Hmmm... a lot happens in a week. At last post the forms were just going up for the foundation.

Since then the walls were poured, the forms removed, and I coated the exterior with foundation sealant. I also installed a radon vent and interior foundation drain. These two items are sort of insurance measures. Some folks say you don't need to worry about radon unless you are on ledge, but others have said its something to take seriously. It is cheap and easy for us to lay in pipe for venting it, so I just went ahead with it. Similarly, the drain running under the slab will deal with any water that the perimeter drain somehow does not take care of. Again, easy to install and worth a lot in saved headaches.

Today was another dramatic day of work: the perimeter drains were installed, crushed stone and filter fabric was then laid in. This all happens at the base of the foundation, next to the footing and is the way in which water that gathers around the foundation is routed out and around the house and then runs out to daylight down the hill.

Granular fill then was added part way up the foundation walls such that you can now stand next to the foundation and look in. The fill is only part way because it is important not to put too much pressure on the concrete until the first floor deck is in place.

Finally, pea stone was graded on the inside of the foundation, covering up the various drains and vents and setting the stage for the next bit of work which is installing a vapor barrier (plastic sheet), rigid insulation, and pex radiant tubing. Joe is coming tomorrow and we'll get these items in place in anticipation of the slab being poured on Friday. Yea Haw! Things are moving along.

I keep telling Nance that this is the dramatic phase, where things happen quickly, and to not be surprised when progress is a little more paced once Joe and I kick in with the building.