Tuesday, November 30, 2010

Root Cellar Latch and Hinges

The latch assembly

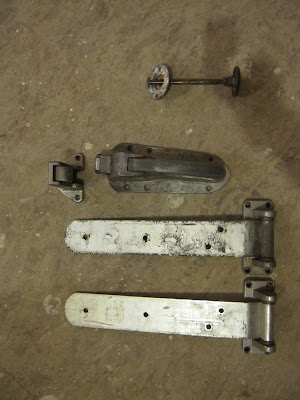
The latch, hinges and inside-release push rod

The root cellar door as it is presently configured. A latch and some honkin' hinges'll round it out, eh?

After trolling for months on eBay I finally found (and won for about $40) just the sort of handle and hinge arrangement I've been hoping to find for the root cellar door. I worked for a bunch of years at a Whole Foods Market doing various physical plant kind of stuff and was familiar with this sort of hardware meant for big heavy doors. Since we built the root cellar I've been inspired by the "antique cooler" vibe and knew I'd come across the right hardware sooner or later. Buying this sort of thing new you'd pay a couple hundred dollars just for the latch assembly; probably the same again for the hinges.

The rod with the round disk at the end is a push-release that allows someone inside the root cellar to activate the latch and let themselves out if somehow the door were closed with them inside. A nice safety feature.

We've got a lot going on right now and installing these parts is not super high on the priority list, so I'll look forward to putting them on when there is a little more time. They came from someone out in California. I wonder what their story is.

Saturday, November 27, 2010

Away


We left town for a few days to celebrate Thanksgiving with Nancy's family. To take advantage of this we spent the day and a half before we left applying the polyurethane finish to the windows and doors. This stuff stinks, so we figured we'd get a whole bunch done and then have a few days away from the house allowing for things to air out. We'll have to do another coat or two sometime soon and will probably stay in the yurt to avoid the stink.

Saturday, November 20, 2010

Status Update


Here's where we're at:

Having installed the beam in the basement I then switched over to reading the second floor bathroom to install the toilet, which happened this morning. Woo hoo! This house is a study in modern miracles, one-by-one and at a moderate pace. In order to install the toilet I needed to finish installing the bead-board, baseboard and cap molding, and then paint it all.

Joe has been working on the stairway project, installing the skirt boards on either side of the stairway and shaping the stair treads and risers in anticipation of installation sometime soon.

I will be returning to the kitchen cabinetry project next week and will probably install the tub in the next few days too up in the second floor bathroom.

The house is more and more our home. It's cozy and it feels good.

Thursday, November 18, 2010

Beam Me UP!


Today we installed the 23' long steel beam under the first floor floor joists and it went smoothly. This included cutting a small rectangle in the floor to allow the post of our hand-cranked lift to be fully extended to then lift the beam all the way up snug against the joists.

Once we'd lifted the beam up under the floor we installed three adjustable posts. When it was all done the first floor felt quite solid and we eliminated a slight depression in that area. It was an involved project but well worth the effort.

Wednesday, November 17, 2010

Meanwhile in the basement

Jeremy, Joe and Aaron in the midst of moving the I-beam down into the basement

Jeremy

This is the interior of the steel supply house. The large orange thing over the racks is a crane that moves on rails to move massive pieces of steel for cutting


We take a brief moment here away from all the finish work upstairs to address a project happening in the basement.

Its been apparent for a while that the first floor has a bit of spring to it. Not enough that would be a problem on any sort of practical level, but enough that you feel the footsteps of someone walking past as you are doing something; enough that I thought it worth reinforcing under the long span of floor joists running under the living/dining area. The solution is to place a beam under the middle point of the span to effectively halve the span of each joist.

I called up the local steel supply house and ordered up a steel I-beam that is 6" high by 6" wide by 23' long. This thing weighs 25lbs. per foot, coming to 575 pounds for our piece; the delivery consisted of unceremoniously flipping it off the edge of the truck bed onto the ground. In order to get it in the basement I had Aaron and Jeremy come over to help Joe and I manoeuvre it, which we did with the ever-amazing garden cart that acted as a set of wheels under the center of the beam as we rolled it to the back hatchway. From there we were able to sort of slide it down into the basement and then move it around on some 2" wooden dowels that Aaron brought over. All told the whole moving project went reasonably easily and safely. Joe borrowed a roll-able lift that acts pretty much like a hand cranked fork lift. We'll use this tomorrow to lift the beam into place and install support posts at both ends and in the middle.

Sunday, November 14, 2010

Lights, camera... LIGHTS!

Felton rendered this ugly tangle into an elegant flow channeled into the electrical panel

The light in the root cellar. This is particularly satisfying to have working because it is otherwise super dark. Now we don't have to mess with headlamps to find what we're looking for

Lights at the peak of the second floor ceiling

On Friday, Felton did the final piece of the house electrical wiring project by wiring in all the various circuits to the electrical panel. It was a bunch of work and he worked longer then his usual afternoon session in order to complete the work he had started. With great fanfare he put the coverplate back on the panel and then proceeded to flip the breakers one by one.

With this, most of the light switches and outlets throughout the house are now live, including the smoke/carbon monoxide sensor system which must be wired in by code. In a couple of cases the breakers wouldn't flip, so Felton has to come back and trace the problem, but hopefully that won't present any major obstacles.

Thursday, November 11, 2010

Pocket Doors


Yesterday morning Joe hung the pocket doors. They look really nice and after we gave them a look and admired them for a couple of minutes, slid them into their protective homes inside the wall.

The last couple of days have been wonderfully warm and today I took advantage of the outside temps to give the kitchen cabinets a first coat of polyurethane finish on the interior. From what I understand, tomorrow and the next day are supposed to be simillarly warm, so I'll continue doing this stinky work outside as long as I can.

Joe is just starting the stair finish tread and riser project with rough cutting all the lumber down to manageable sizes.

Tuesday, November 9, 2010

Doors and Cabinets


I sorted out all the various plywood parts I cut a week or so ago and assembled the kitchen cabinet boxes today. It went quite smoothly and everything fit together as it should. Tomorrow I fix everything in place and start in on the face frame.

Meanwhile, Felton was back continuing work on the electric and has the house nearly all wired up. The one missing element is light fixtures which we have yet to either make or purchase, so for now he is installing your basic porcelain-base fixture so we can have light until we sort out our fixture choices.

Joe wasn't here today but spent the last few days previously installing the interior doors. We all think they are quite handsome.

The tub got it's first coat of yellow-orange. We're diggin' it.

Monday, November 8, 2010

Door Woes

Plan view of the second floor bathroom

This view shows how the door swings into the ceiling plane overhead as it opens. The toilet is hidden behind the orange door.

Another view showing the door intersecting with the ceiling

I spent a bunch of time today puzzling over the best option to solve a door swing issue in the second floor bathroom. Hopefully the images make clear that the door, when opened, swings into the ceiling overhead as it opens to the right.

There are a number of solutions, but all of them involve some compromise.

  • The most obvious might be to reverse the swing from right-hinge to left, but that means that the sink would have to slide off-center from it's intended location and the the light switches would be behind the door when as it is opened entering the room. We could manage the switch relocation if need be, and the sink scootch could be accommodated if we had to.
  • The next option is to have the door swing outwards as you enter. This could work, but it involves a lot of travel as you pull the door towards you in order to open it wide enough to pass. I worry too that the door could be ajar in the darkness and easy to bump into.
  • Another option is to carve out a triangular section of the ceiling over the door. Though unorthodox, this is possible because of the offset framing situation we have in our roof. We could carve into the roof plane without much consequence. At worst we'd have a slightly smaller R-value in that area.
  • A forth possibility is a little more of a stretch. This would be to design and build a curved pocket door that would travel into the wall to the right of the door as it is currently located. I'm not sure if this would even work, but I could figure that out pretty quickly. From there it would be a lot of work to build a curved door and custom track, not to mention opening up the wall.

Sunday, November 7, 2010

The tub comes upstairs

The tub very near its new home

Carrying the tub in


Nancy and I continued work on painting and installing bathroom bead-board respectively this weekend, with some nice progress to show. It won't be long before we'll start using words like "done" and "complete" regarding certain specific aspects of the process.

Most fun of all was getting help from our friends Dan, Addie, Matt and Hannah who helped us carry the claw foot tub in from the back yard and up the stairs to the second floor. It actually wasn't that bad, but then again we had lots of hands making it possible.

I'm back from teaching and ready to get rolling again...

Monday, November 1, 2010

While I'm away...


..teaching at Yestermorrow this week, work is continuing.

Nancy has been continuing to paint and Joe is working on finishing up the window trim around the house, and is nearly there. Soon after will follow the installation of the interior doors. Fun.

I spent a little time over the weekend installing bead-board in the second floor bathroom. It goes really quick, but unfortunatly I ran out of time and I'm not sure if I'll be able to get back to it until the end of this class.

In any event things are moving along.